Istio一个开源的Service Mesh平台 - 微服务网格技术
- 背景
- 架构
- 部署模型
- 性能和可扩展性
- 课程安排
- 1. 11 月 1 日-Istio 初探
- 2. 11 月 8 日-Istio 上手
- 3. 11 月 15 日-Istio 的安全管理
- 4. 11 月 22 日-Envoy
- 5. 11 月 29 日-使用 Istio 来监控和可视化微服务
- 6. 12 月 6 日-Istio mixer – 基本概念,策略、遥测与扩展
- 7. 12 月 13 日-Istio 跨云管理方案解析
- 8. 12 月 20 日-Istio 使用案例:Serverless 平台knative
- Refer
背景
随着容器技术的快速发展,越来越多的企业从一体化应用转型迁移到了微服务架构。微服务在带来良好的设计和架构理念的同时,也引入了复杂的微服务治理等难题。安全,流量控制,监控,日志在微服务架构中越来越难实现,更复杂的需求诸如A/B 测试,蓝绿发布,访问控制,策略管理更成为了微服务系统中负担。为了解决这些问题,服务网格技术应运而生,而Istio做为服务网格技术的先驱者也受到了越来越多的关注。
Istio, 一个用来连接,保护,管理和监测微服务的开源平台,以其先进的理念、强大的企业支持(IBM, Google & Lyft)、活跃的社区越来越多的受到了业界关注。Istio 提供一种简单的方式来为已部署的微服务建立网络,该网络具有负载均衡、服务间认证、监控等功能,而且不需要对微服务的代码做任何改动。
如何在你的微服务网络中引入 Istio 并用它来解决微服务治理中的诸多难题呢?
架构
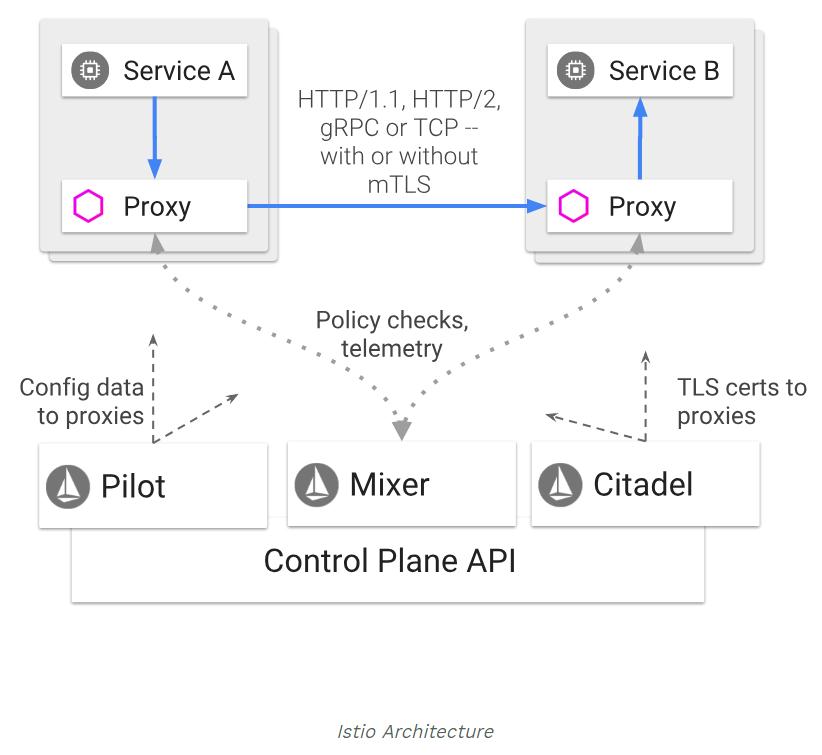
Istio 服务网格从逻辑上分为数据平面和控制平面。
- 数据平面:由一组智能代理(
Envoy)组成,被部署为 Sidecar。这些代理负责协调和控制微服务之间的所有网络通信。它们还收集和报告所有网格流量的遥测数据。 - 控制平面:管理并配置代理来进行流量路由。

组件
Envoy
Istio 使用 Envoy 代理的扩展版本。Envoy 是用 C++ 开发的高性能代理,用于协调服务网格中所有服务的入站和出站流量。Envoy 代理是唯一与数据平面流量交互的 Istio 组件。
Envoy 代理被部署为服务的 Sidecar,在逻辑上为服务增加了 Envoy 的许多内置特性,例如:
- 动态服务发现
- 负载均衡
- TLS 终端
- HTTP/2 与 gRPC 代理
- 熔断器
- 健康检查
- 基于百分比流量分割的分阶段发布
- 故障注入
- 丰富的指标
这种 Sidecar 部署允许 Istio 可以执行策略决策,并提取丰富的遥测数据,接着将这些数据发送到监视系统以提供有关整个网格行为的信息。
Sidecar 代理模型还允许您向现有的部署添加 Istio 功能,而不需要重新设计架构或重写代码。
由 Envoy 代理启用的一些 Istio 的功能和任务包括:
- 流量控制功能:通过丰富的 HTTP、gRPC、WebSocket 和 TCP 流量路由规则来执行细粒度的流量控制。
- 网络弹性特性:重试设置、故障转移、熔断器和故障注入。
- 安全性和身份认证特性:执行安全性策略,并强制实行通过配置 API 定义的访问控制和速率限制。
- 基于 WebAssembly 的可插拔扩展模型,允许通过自定义策略执行和生成网格流量的遥测。
Istiod
Istiod 提供服务发现、配置和证书管理。
Istiod 将控制流量行为的高级路由规则转换为 Envoy 特定的配置,并在运行时将其传播给 Sidecar。Pilot 提取了特定平台的服务发现机制,并将其综合为一种标准格式,任何符合 Envoy API 的 Sidecar 都可以使用。
Istio 可以支持发现多种环境,如 Kubernetes 或 VM。
您可以使用 Istio 流量管理 API 让 Istiod 重新构造 Envoy 的配置,以便对服务网格中的流量进行更精细的控制。
Istiod 安全通过内置的身份和凭证管理,实现了强大的服务对服务和终端用户认证。您可以使用 Istio 来升级服务网格中未加密的流量。使用 Istio,运营商可以基于服务身份而不是相对不稳定的第 3 层或第 4 层网络标识符来执行策略。此外,您可以使用 Istio 的授权功能控制谁可以访问您的服务。
Istiod 充当证书授权(CA),并生成证书以允许在数据平面中进行安全的 mTLS 通信。
refer:
- https://istio.io/latest/zh/docs/ops/deployment/architecture/
部署模型
当您将 Istio 用于生产环境部署时,需要回答一系列的问题。 网格将被限制在单个 集群 中还是分布在多个集群中? 是将所有服务都放置在单个完全连接的网络中,还是需要网关来跨多个网络连接服务? 是否存在单个控制平面(可能在集群之间共享),或者是否部署了多个控制平面以确保高可用(HA)? 如果要部署多个集群(更具体地说是在隔离的网络中),是否要将它们连接到单个多集群服务网格中, 还是将它们联合到一个 多网格 部署中?
所有这些问题,都代表了 Istio 部署的独立配置维度。
- 单一或多个集群
- 单一或多个网络
- 单一或多控制平面
- 单一或多个网格
所有组合都是可能的,尽管某些组合比其他组合更常见,并且某些组合显然不是很有趣(例如,单一集群中有多个网格)。
在涉及多个集群的生产环境部署中,部署可能使用多种模式。 例如,基于 3 个集群实现多控制平面的高可用部署,您可以通过使用单一控制平面部署 2 个集群,然后再添加第 3 个集群和 第 2 个控制平面来实现这一点,最后,再将所有 3 个集群配置为共享 2 个控制平面,以确保所有集群都有 2 个控制源来确保 HA。
如何选择正确的部署模型,取决于您对隔离性、性能和 HA 的要求。 See more
性能和可扩展性
Istio 以十分便捷且对应用程序透明的方式,为已部署的服务创建网络,提供完善的网络功能,包括:路由规则、负载均衡、服务到服务的验证以及监控等。Istio 致力于用最小的资源开销实现最大的便易性,旨在支持高请求密度的大规模网格,同时让延迟最小化。
Istio 的数据平面组件 Envoy 代理用来处理通过系统的数据流。控制平面组件如 Pilot、Galley 和 Citadel 负责配置数据平面。数据平面和控制平面有不同的性能关注点。
课程安排
1. 11 月 1 日-Istio 初探
LIN SUN, Senior Technical Staff Member, IBM
Problem:
modern distributed architecture -> container based services deployed into dynamic environments composed via the network
IT’s shift to a modern distributed architecture has left enterprises unable to connect, observe or secure or control their services in a consistent way.
Service Mesh:
A service mesh provides a transparent and language-independent network for connecting, observing, securing and controlling the connectivity between services.
Istio:
An open service mesh platform to connect, observe, secure, and control microservices.
- Connect: Traffic Control, Discovery, Load Balancing, Resiliency
- Observe: Metrics, Logging, Tracing
- Secure: Encryption(TLS), Authentication, and Authorization of service-to-service communication
- Control: Policy Enforcement
How does it work ?
                call
       A ------------------> B

                |
                |
                v

       A ------------------> B

                call
     Envoy  ------------>   Envoy

                |
                |
                v

       A                     B
                call
     Envoy  ------------>   Envoy

       ^                      ^
       |                      |
       |                      |
     Envoy --------------------
     Pilot

                |
                |
                v

       A       call           B
     Envoy  ------------>   Envoy

       |                     |
       |------|   |----------|
              |   |
              v   v

     Envoy    Envoy
     Pilot   Telemetry

                |
                |
                v

       A       call           B
     Envoy  ------------>   Envoy

       ^                       ^
       |                       |
       |--------------------|  |
                            |  |

     Envoy    Envoy         Envoy
     Pilot   Telemetry      Citadel

                |
                |
                v

       A               call              B
     Envoy  ------------------------>   Envoy

       ^                                   ^
       |                                   |
       |--------------------------------|  |
                                        |  |

     Envoy    Envoy         Envoy       Envoy
     Pilot   Telemetry      Citadel     Policy
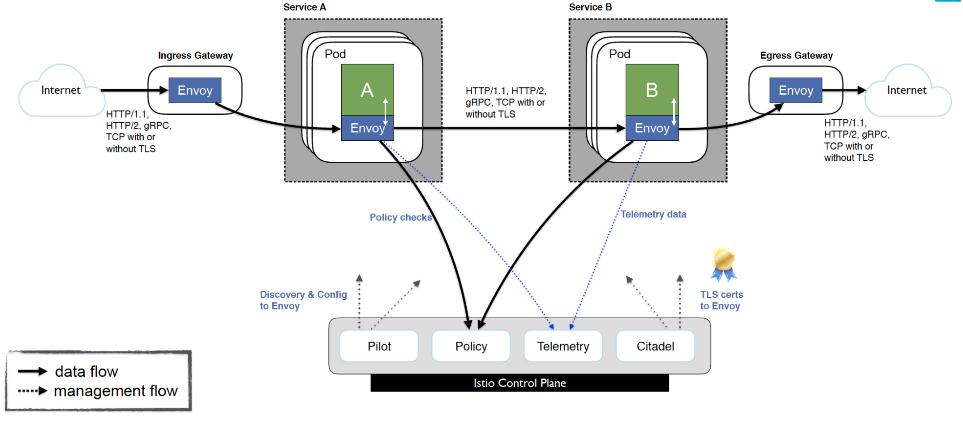
- Deploy a proxy (
Envoy) beside your application (“sidecar deployment”) - Deploy
Pilotto configure the sidecars - Deploy Telemetry to get telemetry
- Deploy Citadel to assign identities and enable secure communication
- Deploy Policy to enforce policies
A calls B A’s sidecar intercepts the call A’s sidecar selects a destination B’s sidecar performs policy checks with local cache B’s sidecar performs policy checks with Policy component B’s sidecar forwards the call to B B’s response is sent back Both sidecars report telemetry data
2. 11 月 8 日-Istio 上手
Iris Ding, 此课程设计者, dingsj@cn.ibm.com
Microservice Architecture:
An engineering approach focused on decomposing an application into single function modules with well defined interfaces which are independently deployed and operated by a small team who owns the entire lifecycle of the service.
Service Mesh:
A network for services
- Visibility
- Resiliency & Efficiency
- Traffic Control
- Security
- Policy Enforcement
Istio Installation:
- Istio-demo.yaml - Dev/Test (开发测试时使用,缺点是需要修改yaml较为麻烦)
- Helm Render (自定义安装,render出一个yaml文件,然后用kubectl安装)
- Helm
- Minimum Istio (最轻量的一个安装方式)
- Notice: Apply crds first
Example:
https://istio.io/docs/examples/bookinfo
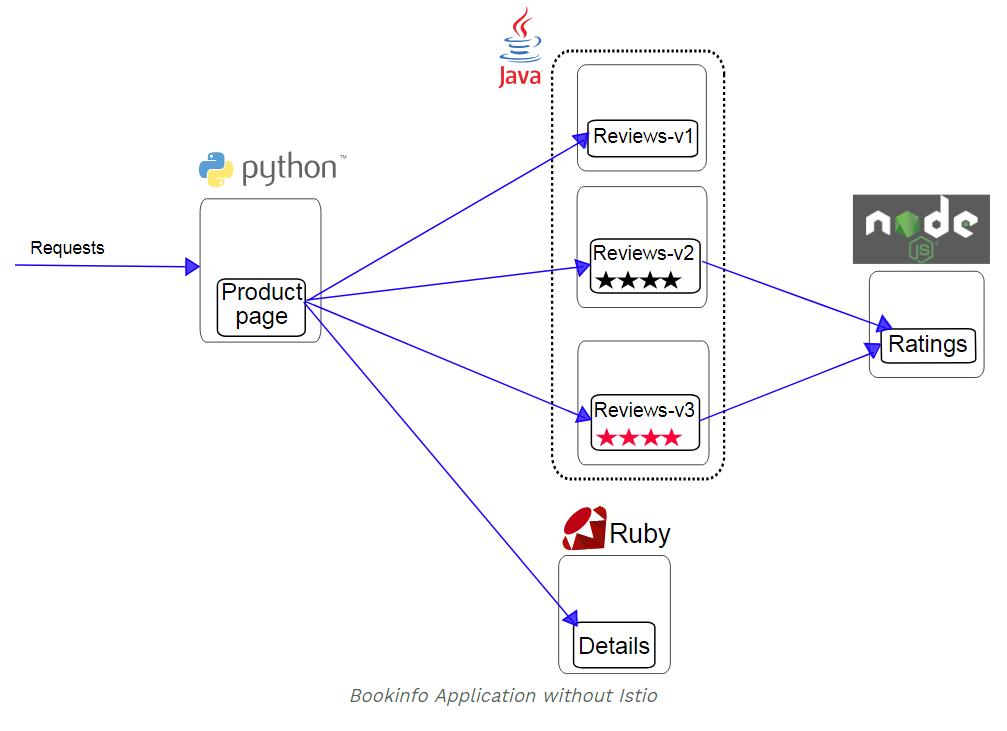
This application is polyglot, i.e., the microservices are written in different languages. It’s worth noting that these services have no dependencies on Istio, but make an interesting service mesh example, particularly because of the multitude of services, languages and versions for the reviews service.
To run the sample with Istio requires no changes to the application itself. Instead, we simply need to configure and run the services in an Istio-enabled environment, with Envoy sidecars injected along side each service. The needed commands and configuration vary depending on the runtime environment although in all cases the resulting deployment will look like this:
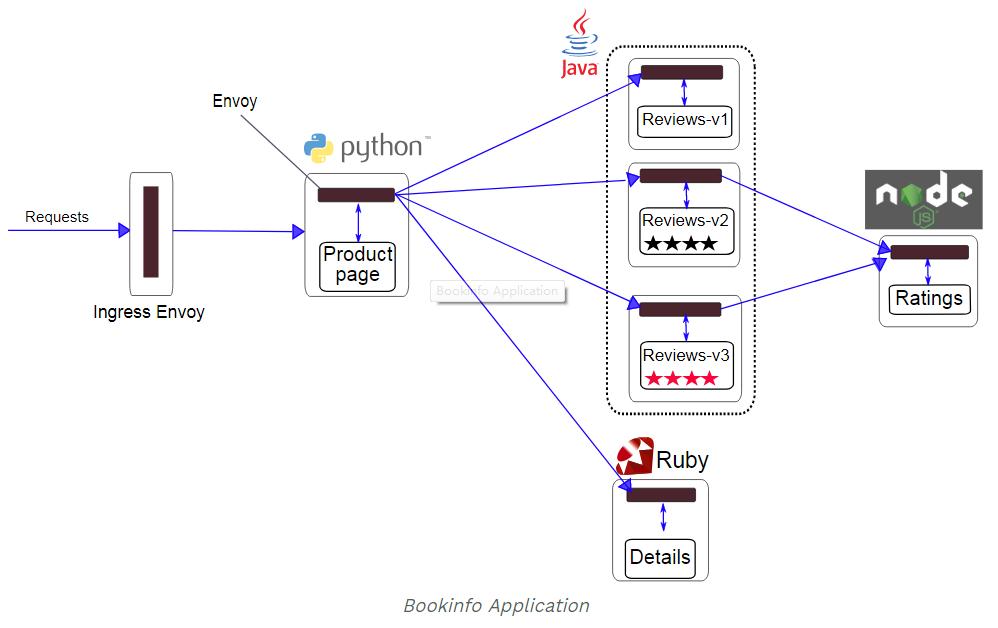
All of the microservices will be packaged with an Envoy sidecar that intercepts incoming and outgoing calls for the services, providing the hooks needed to externally control, via the Istio control plane, routing, telemetry collection, and policy enforcement for the application as a whole.
Envoy - sidecar proxy in Istio:
- A C++ based L4/L7 proxy (支持4层和7层转发)
- Battle-tested (经过大规模验证)
- Low memory footprint (非常高效)

Istio setup
How to deploy Istio in various environments (e.g., Kubernetes, Consul)
download istio
https://istio.io/docs/setup/kubernetes/download-release/
root@ubuntu-s-2vcpu-4gb-sfo2-01:~# istioctl

Istio configuration command line utility.

Create, list, modify, and delete configuration resources in the Istio
system.

Available routing and traffic management configuration types:

        [virtualservice gateway destinationrule serviceentry httpapispec httpapispecbinding quotaspec quotaspecbinding servicerole servicerolebinding policy]

See https://istio.io/docs/reference/ for an overview of Istio routing.

Usage:
  istioctl [command]

Available Commands:
  authn          Interact with Istio authentication policies
  context-create Create a kubeconfig file suitable for use with istioctl in a non kubernetes environment
  create         Create policies and rules
  delete         Delete policies or rules
  deregister     De-registers a service instance
  experimental   Experimental commands that may be modified or deprecated
  gen-deploy     Generates the configuration for Istio's control plane.
  get            Retrieve policies and rules
  help           Help about any command
  kube-inject    Inject Envoy sidecar into Kubernetes pod resources
  proxy-config   Retrieve information about proxy configuration from Envoy [kube only]
  proxy-status   Retrieves the synchronization status of each Envoy in the mesh [kube only]
  register       Registers a service instance (e.g. VM) joining the mesh
  replace        Replace existing policies and rules
  version        Prints out build version information

Flags:
      --context string                The name of the kubeconfig context to use
  -h, --help                          help for istioctl
  -i, --istioNamespace string         Istio system namespace (default "istio-system")
  -c, --kubeconfig string             Kubernetes configuration file
      --log_as_json                   Whether to format output as JSON or in plain console-friendly format
      --log_caller string             Comma-separated list of scopes for which to include caller information, scopes can be any of [ads, default, model, rbac]
      --log_output_level string       Comma-separated minimum per-scope logging level of messages to output, in the form of <scope>:<level>,<scope>:<level>,... where scope can be one of [ads, default, model, rbac] and level can be one of [debug, info, warn, error, none] (default "default:info")
      --log_rotate string             The path for the optional rotating log file
      --log_rotate_max_age int        The maximum age in days of a log file beyond which the file is rotated (0 indicates no limit) (default 30)
      --log_rotate_max_backups int    The maximum number of log file backups to keep before older files are deleted (0 indicates no limit) (default 1000)
      --log_rotate_max_size int       The maximum size in megabytes of a log file beyond which the file is rotated (default 104857600)
      --log_stacktrace_level string   Comma-separated minimum per-scope logging level at which stack traces are captured, in the form of <scope>:<level>,<scope:level>,... where scope can be one of [ads, default, model, rbac] and level can be one of [debug, info, warn, error, none] (default "default:none")
      --log_target stringArray        The set of paths where to output the log. This can be any path as well as the special values stdout and stderr (default [stdout])
  -n, --namespace string              Config namespace
  -p, --platform string               Istio host platform (default "kube")

Use "istioctl [command] --help" for more information about a command.
Quick Start with Kubernetes
https://istio.io/docs/setup/kubernetes/quick-start/ https://kubernetes.io/docs/tasks/tools/install-minikube/
install kubectl
https://kubernetes.io/docs/tasks/tools/install-kubectl/
Install kubectl binary using native package management:
#!/bin/bashls
# install-kubectl.sh
# ubuntu

sudo apt-get update && sudo apt-get install -y apt-transport-https
curl -s https://packages.cloud.google.com/apt/doc/apt-key.gpg | sudo apt-key add -
echo "deb http://apt.kubernetes.io/ kubernetes-xenial main" | sudo tee -a /etc/apt/sources.list.d/kubernetes.list
sudo apt-get update
sudo apt-get install -y kubectl
安装后:
# minikube start
Starting local Kubernetes v1.10.0 cluster...
Starting VM...
Getting VM IP address...
Moving files into cluster...
Setting up certs...
Connecting to cluster...
Setting up kubeconfig...
Starting cluster components...
Kubectl is now configured to use the cluster.
Loading cached images from config file.

# kubectl version
Client Version: version.Info{Major:"1", Minor:"12", GitVersion:"v1.12.2", GitCommit:"17c77c7898218073f14c8d573582e8d2313dc740", GitTreeState:"clean", BuildDate:"2018-10-24T06:54:59Z", GoVersion:"go1.10.4", Compiler:"gc", Platform:"linux/amd64"}
Server Version: version.Info{Major:"1", Minor:"10", GitVersion:"v1.10.0", GitCommit:"fc32d2f3698e36b93322a3465f63a14e9f0eaead", GitTreeState:"clean", BuildDate:"2018-03-26T16:44:10Z", GoVersion:"go1.9.3", Compiler:"gc", Platform:"linux/amd64"}
install Hypervisor
https://kubernetes.io/docs/tasks/tools/install-minikube/#install-a-hypervisor
sudo apt-get update
# 5.2
sudo apt-get install virtualbox
# or
sudo dpkg -i packagename.deb
# check version
vboxmanage --version
5.2.18_Ubuntur123745
install minikube
https://github.com/kubernetes/minikube/releases
curl -Lo minikube https://storage.googleapis.com/minikube/releases/v0.30.0/minikube-linux-amd64 && chmod +x minikube && sudo cp minikube /usr/local/bin/ && rm minikube
https://istio.io/docs/setup/kubernetes/platform-setup/minikube/
启动minkube的方法:
#!/bin/bash
# start_minikube.sh

export MINIKUBE_WANTUPDATENOTIFICATION=false
export MINIKUBE_WANTREPORTERRORPROMPT=false
export MINIKUBE_HOME=$HOME
export CHANGE_MINIKUBE_NONE_USER=true
mkdir $HOME/.kube || true
touch $HOME/.kube/config

export KUBECONFIG=$HOME/.kube/config
sudo -E minikube start --vm-driver=none

# 使用kubectl检查api server, 确保集群创建成功
for i in {1..150}; do # timeout for 5 minutes
	kubectl get po &> /dev/null
	if [ &? -ne 1 ]; then
		break
	fi
	sleep 2
done
# minikube start --vm-driver=virtualbox
Starting local Kubernetes v1.10.0 cluster...
Starting VM...
Getting VM IP address...
Moving files into cluster...
Downloading kubeadm v1.10.0
Downloading kubelet v1.10.0
Finished Downloading kubelet v1.10.0
Finished Downloading kubeadm v1.10.0
Setting up certs...
Connecting to cluster...
Setting up kubeconfig...
Starting cluster components...
Kubectl is now configured to use the cluster.
Loading cached images from config file.

# ps ux|grep mini
root      3075  166 31.4 3338904 1270108 ?     Sl   08:24  24:56 /usr/lib/virtualbox/VBoxHeadless --comment minikube --startvm fd44ccb2-d4ca-4923-a09e-e9dce20f02ca --vrde config
Install Istio’s Custom Resource Definitions via kubectl apply
kubectl apply -f install/kubernetes/helm/istio/templates/crds.yaml
Install Istio without mutual TLS authentication between sidecars
kubectl apply -f install/kubernetes/istio-demo.yaml
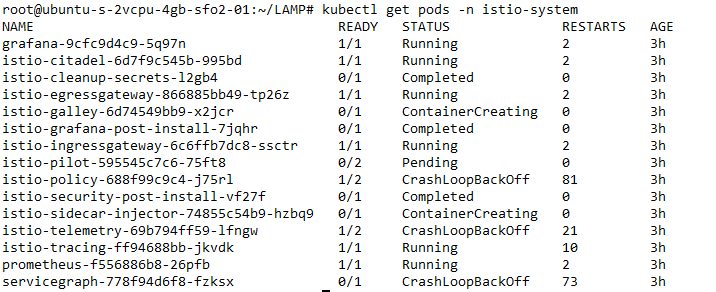
Verifying the installation
查看Istio启动pods的情况,比较慢。

3. 11 月 15 日-Istio 的安全管理
4. 11 月 22 日-Envoy
5. 11 月 29 日-使用 Istio 来监控和可视化微服务
6. 12 月 6 日-Istio mixer – 基本概念,策略、遥测与扩展
7. 12 月 13 日-Istio 跨云管理方案解析
8. 12 月 20 日-Istio 使用案例:Serverless 平台knative
Refer
- istio官网
- Istio系列-IBM 微讲堂
- Istio 流量管理的基本概念详解-以 Bookinfo 为例详解其如何作用于 Kubernetes 中的 Pod
- kubernetes-vagrant-centos-cluster
- 什么是 istio
- https://istio.io/latest/zh/docs/