Organizing a Go module
- Tutorial: Create a Go module
- Call your code from another module
- Managing module source
- Organizing a Go module
- Refer
A common question developers new to Go have is “How do I organize my Go project?”, in terms of the layout of files and folders. The goal of this document is to provide some guidelines that will help answer this question. To make the most of this document, make sure you’re familiar with the basics of Go modules by reading Tutorial: Create a Go module and managing module source.
Go projects can include packages, command-line programs or a combination of the two. This guide is organized by project type.
Tutorial: Create a Go module
This is the first part of a tutorial that introduces a few fundamental features of the Go language. If you’re just getting started with Go, be sure to take a look at Tutorial: Get started with Go, which introduces the go command, Go modules, and very simple Go code.
In this tutorial you’ll create two modules. The first is a library which is intended to be imported by other libraries or applications. The second is a caller application which will use the first.
This tutorial’s sequence includes seven brief topics that each illustrate a different part of the language.
- Create a module – Write a small module with functions you can call from another module.
- Call your code from another module – Import and use your new module.
- Return and handle an error – Add simple error handling.
- Return a random greeting – Handle data in slices (Go’s dynamically-sized arrays).
- Return greetings for multiple people – Store key/value pairs in a map.
- Add a test – Use Go’s built-in unit testing features to test your code.
- Compile and install the application – Compile and install your code locally.
Note: For other tutorials, see Tutorials.
Prerequisites
- Some programming experience. The code here is pretty simple, but it helps to know something about
functions,loops, andarrays. - A tool to edit your code. Any text editor you have will work fine. Most text editors have good support for Go. The most popular are
VSCode(free),GoLand(paid), andVim(free). - A command terminal. Go works well using any terminal on Linux and Mac, and on PowerShell or cmd in Windows.
Start a module that others can use
Start by creating a Go module. In a module, you collect one or more related packages for a discrete and useful set of functions. For example, you might create a module with packages that have functions for doing financial analysis so that others writing financial applications can use your work. For more about developing modules, see Developing and publishing modules.
Go code is grouped into packages, and packages are grouped into modules. Your module specifies dependencies needed to run your code, including the Go version and the set of other modules it requires.
As you add or improve functionality in your module, you publish new versions of the module. Developers writing code that calls functions in your module can import the module’s updated packages and test with the new version before putting it into production use.
- Open a command prompt and cd to your home directory.
On Linux or Mac:
cd
On Windows:
cd %HOMEPATH%
- Create a greetings directory for your Go module source code.
For example, from your home directory use the following commands:
mkdir greetings
cd greetings
- Start your module using the go mod init command.
Run the go mod init command, giving it your module path – here, use example.com/greetings. If you publish a module, this must be a path from which your module can be downloaded by Go tools. That would be your code’s repository.
For more on naming your module with a module path, see Managing dependencies.
$ go mod init example.com/greetings
go: creating new go.mod: module example.com/greetings
The go mod init command creates a go.mod file to track your code’s dependencies. So far, the file includes only the name of your module and the Go version your code supports. But as you add dependencies, the go.mod file will list the versions your code depends on. This keeps builds reproducible and gives you direct control over which module versions to use.
- In your text editor, create a file in which to write your code and call it
greetings.go.
- Paste the following code into your
greetings.gofile and save the file.
package greetings
import "fmt"
// Hello returns a greeting for the named person.
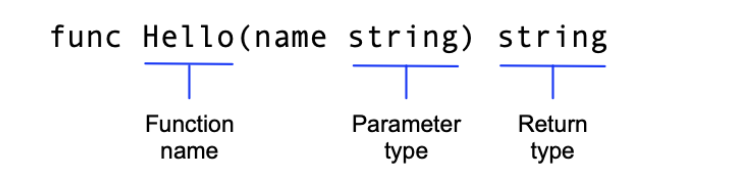
func Hello(name string) string {
// Return a greeting that embeds the name in a message.
message := fmt.Sprintf("Hi, %v. Welcome!", name)
return message
}
This is the first code for your module. It returns a greeting to any caller that asks for one. You’ll write code that calls this function in the next step.
In this code, you:
- Declare a greetings package to collect related functions.
- Implement a Hello function to return the greeting.
This function takes a name parameter whose type is string. The function also returns a string. In Go, a function whose name starts with a capital letter can be called by a function not in the same package. This is known in Go as an exported name. For more about exported names, see Exported names in the Go tour.
- Declare a message variable to hold your greeting.
In Go, the := operator is a shortcut for declaring and initializing a variable in one line (Go uses the value on the right to determine the variable’s type). Taking the long way, you might have written this as:
var message string
message = fmt.Sprintf("Hi, %v. Welcome!", name)
-
Use the
fmtpackage’s Sprintf function to create a greeting message. The first argument is a format string, andSprintfsubstitutes the name parameter’s value for the%vformat verb. Inserting the value of the name parameter completes the greeting text. -
Return the formatted greeting text to the caller.
In the next step, you’ll call this function from another module.
Call your code from another module
In the previous section, you created a greetings module. In this section, you’ll write code to make calls to the Hello function in the module you just wrote. You’ll write code you can execute as an application, and which calls code in the greetings module.
- Create a
hellodirectory for your Go module source code. This is where you’ll write your caller.
After you create this directory, you should have both a hello and a greetings directory at the same level in the hierarchy, like so:
<home>/
 |-- greetings/
 |-- hello/
For example, if your command prompt is in the greetings directory, you could use the following commands:
cd ..
mkdir hello
cd hello
- Enable dependency tracking for the code you’re about to write.
To enable dependency tracking for your code, run the go mod init command, giving it the name of the module your code will be in.
For the purposes of this tutorial, use example.com/hello for the module path.
$ go mod init example.com/hello
go: creating new go.mod: module example.com/hello
- In your text editor, in the
hellodirectory, create a file in which to write your code and call ithello.go.
- Write code to call the
Hellofunction, then print the function’s return value.
To do that, paste the following code into hello.go.
package main

import (
    "fmt"
    "example.com/greetings"
)

func main() {
    // Get a greeting message and print it.
    message := greetings.Hello("Gladys")
    fmt.Println(message)
}
In this code, you:
- Declare a
mainpackage. In Go, code executed as an application must be in amainpackage. - Import two packages:
example.com/greetingsand thefmtpackage. This gives your code access to functions in those packages. Importingexample.com/greetings(the package contained in the module you created earlier) gives you access to theHellofunction. You also importfmt, with functions for handling input and output text (such as printing text to the console). - Get a greeting by calling the greetings package’s
Hellofunction.
- Edit the
example.com/hellomodule to use your localexample.com/greetingsmodule.
For production use, you’d publish the example.com/greetings module from its repository (with a module path that reflected its published location), where Go tools could find it to download it. For now, because you haven’t published the module yet, you need to adapt the example.com/hello module so it can find the example.com/greetings code on your local file system.
To do that, use the go mod edit command to edit the example.com/hello module to redirect Go tools from its module path (where the module isn’t) to the local directory (where it is).
- From the command prompt in the
hellodirectory, run the following command:
$ go mod edit -replace example.com/greetings=../greetings
The command specifies that example.com/greetings should be replaced with ../greetings for the purpose of locating the dependency. After you run the command, the go.mod file in the hello directory should include a replace directive:
module example.com/hello

go 1.16

replace example.com/greetings => ../greetings
- From the command prompt in the
hellodirectory, run thego mod tidycommand to synchronize theexample.com/hellomodule’s dependencies, adding those required by the code, but not yet tracked in the module.
$ go mod tidy
go: found example.com/greetings in example.com/greetings v0.0.0-00010101000000-000000000000
After the command completes, the example.com/hello module’s go.mod file should look like this:
module example.com/hello

go 1.16

replace example.com/greetings => ../greetings

require example.com/greetings v0.0.0-00010101000000-000000000000
The command found the local code in the greetings directory, then added a require directive to specify that example.com/hello requires example.com/greetings. You created this dependency when you imported the greetings package in hello.go.
The number following the module path is a pseudo-version number – a generated number used in place of a semantic version number (which the module doesn’t have yet).
To reference a published module, a go.mod file would typically omit the replace directive and use a require directive with a tagged version number at the end.
require example.com/greetings v1.1.0
For more on version numbers, see Module version numbering.
- At the command prompt in the
hellodirectory, run your code to confirm that it works.
$ go run .
Hi, Gladys. Welcome!
Congrats! You’ve written two functioning modules.
Managing module source
When you’re developing modules to publish for others to use, you can help ensure that your modules are easier for other developers to use by following the repository conventions described in this topic.
This topic describes actions you might take when managing your module repository. For information about the sequence of workflow steps you’d take when revising from version to version, see Module release and versioning workflow.
Some of the conventions described here are required in modules, while others are best practices. This content assumes you’re familiar with the basic module use practices described in Managing dependencies.
Go supports the following repositories for publishing modules: Git, Subversion, Mercurial, Bazaar, and Fossil.
For an overview of module development, see Developing and publishing modules.
How Go tools find your published module
In Go’s decentralized system for publishing modules and retrieving their code, you can publish your module while leaving the code in your repository. Go tools rely on naming rules that have repository paths and repository tags indicating a module’s name and version number. When your repository follows these requirements, your module code is downloadable from your repository by Go tools such as the go get command.
When a developer uses the go get command to get source code for packages their code imports, the command does the following:
- From
importstatements in Go source code,go getidentifies the module path within the package path. - Using a URL derived from the module path, the command locates the module source on a module proxy server or at its repository directly.
- Locates source for the module version to download by matching the module’s version number to a repository tag to discover the code in the repository. When a version number to use is not yet known, go get locates the latest release version.
- Retrieves module source and downloads it to the developer’s local module cache.
Organizing code in the repository
You can keep maintenance simple and improve developers’ experience with your module by following the conventions described here. Getting your module code into a repository is generally as simple as with other code.
The following diagram illustrates a source hierarchy for a simple module with two packages.
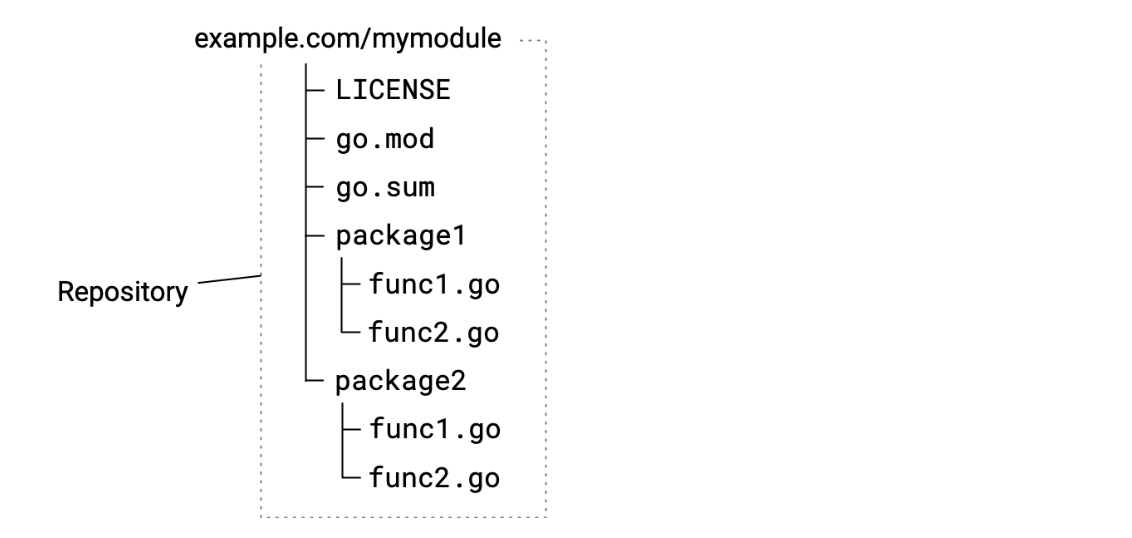
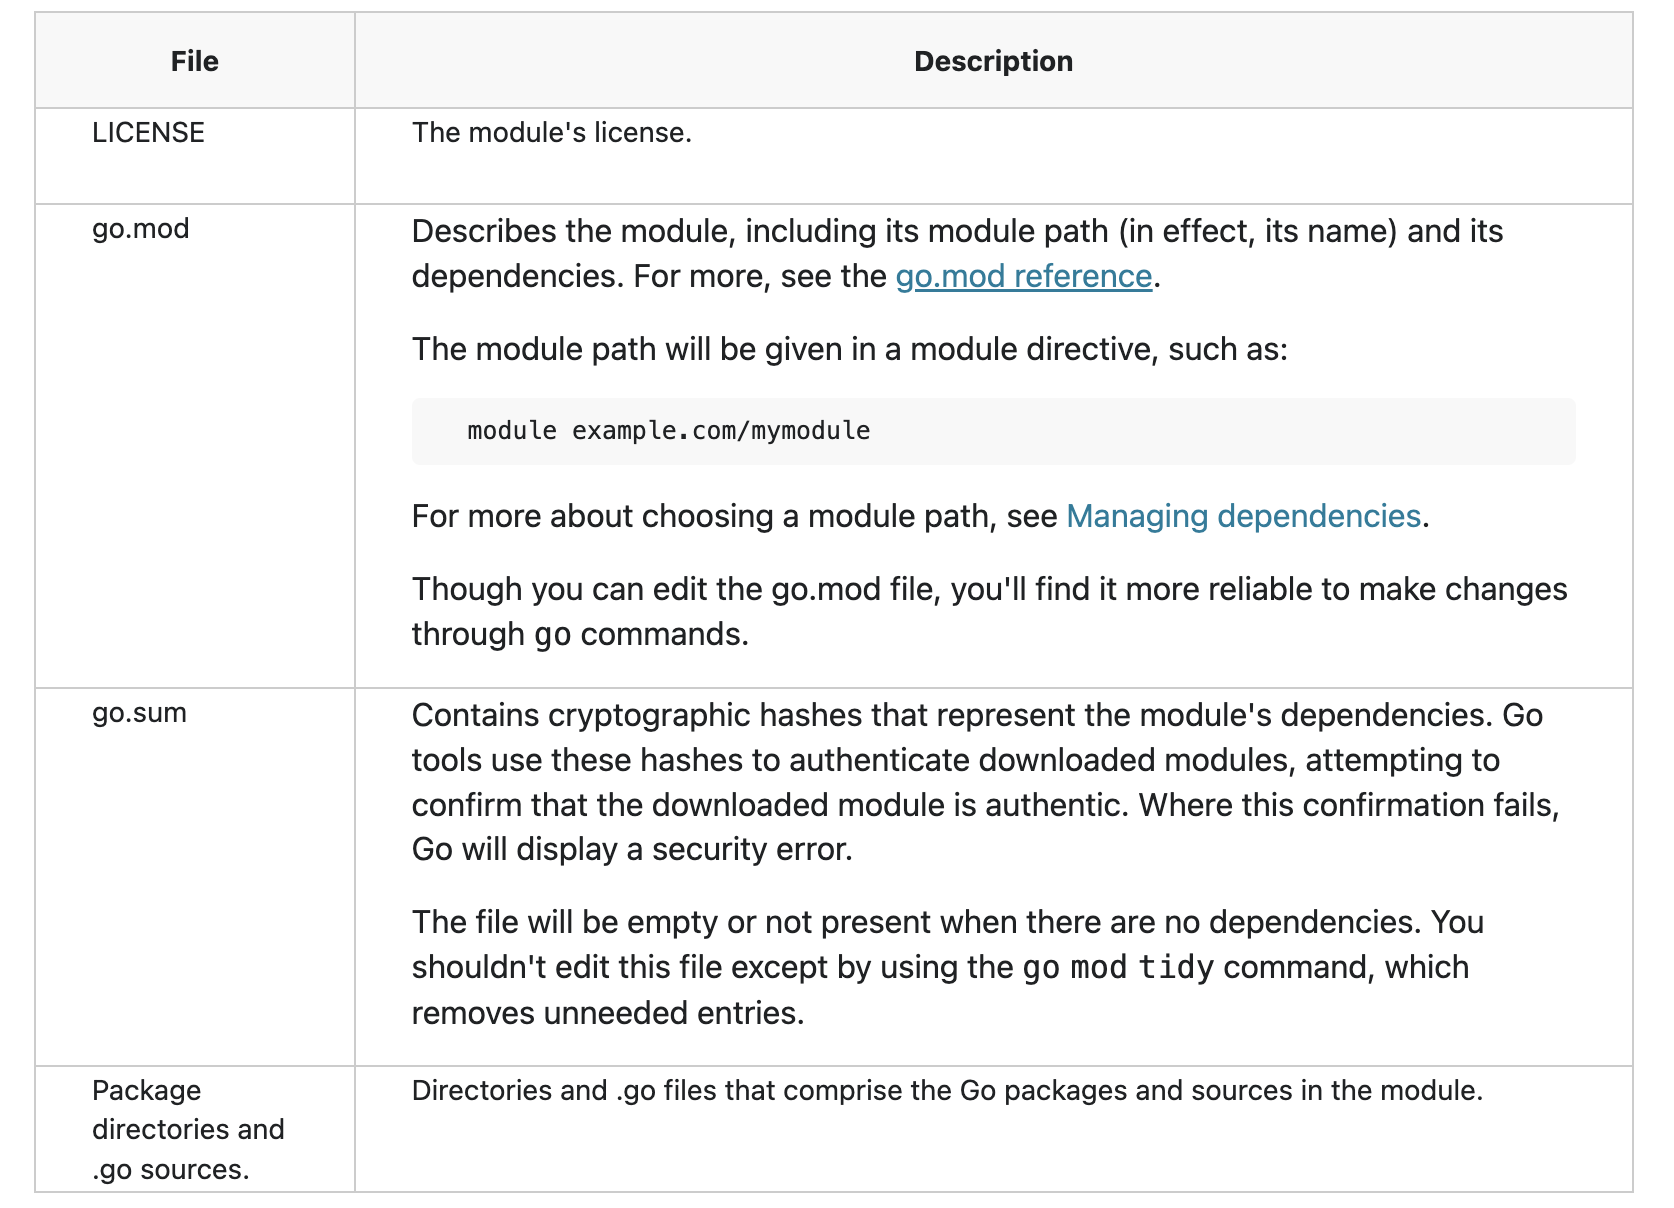
Your initial commit should include files listed in the following table:
From the command-line, you can create an empty repository, add the files that will be part of your initial commit, and commit with a message. Here’s an example using git:
$ git init
$ git add --all
$ git commit -m "mycode: initial commit"
$ git push
Choosing repository scope
You publish code in a module when the code should be versioned independently from code in other modules.
Designing your repository so that it hosts a single module at its root directory will help keep maintenance simpler, particularly over time as you publish new minor and patch versions, branch into new major versions, and so on. However, if your needs require it, you can instead maintain a collection of modules in a single repository.
Sourcing one module per repository
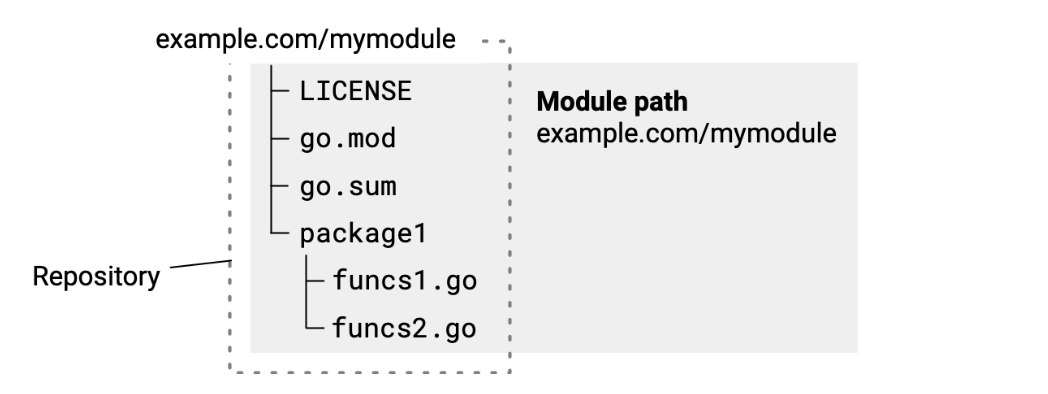
You can maintain a repository that has a single module’s source in it. In this model, you place your go.mod file at the repository root, with package subdirectories containing Go source beneath.
This is the simplest approach, making your module likely easier to manage over time. It helps you avoid the need to prefix a module version number with a directory path.
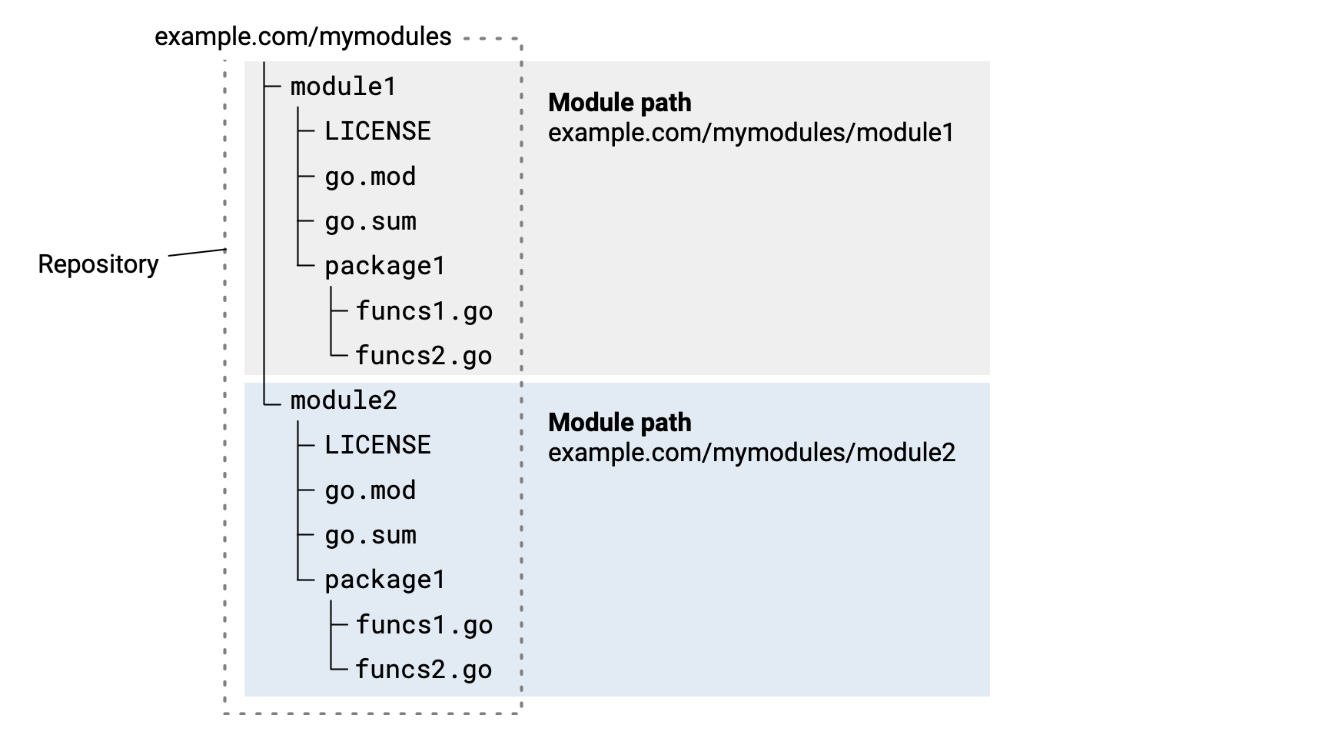
Sourcing multiple modules in a single repository
You can publish multiple modules from a single repository. For example, you might have code in a single repository that constitutes multiple modules, but want to version those modules separately.
Each subdirectory that is a module root directory must have its own go.mod file.
Sourcing module code in subdirectories changes the form of the version tag you must use when publishing a module. You must prefix the version number part of the tag with the name of the subdirectory that is the module root. For more about version numbers, see Module version numbering.
For example, for module example.com/mymodules/module1 below, you would have the following for version v1.2.3:
- Module path:
example.com/mymodules/module1 - Version tag:
module1/v1.2.3 - Package path imported by a user:
example.com/mymodules/module1/package1 - Module path and version as specified in a user’s require directive:
example.com/mymodules/module1 v1.2.3
Organizing a Go module
Basic package
A basic Go package has all its code in the project’s root directory. The project consists of a single module, which consists of a single package. The package name matches the last path component of the module name. For a very simple package requiring a single Go file, the project structure is:
project-root-directory/
  go.mod
  modname.go
  modname_test.go
Assuming this directory is uploaded to a GitHub repository at github.com/someuser/modname, the module line in the go.mod file should say module github.com/someuser/modname.
The code in modname.go declares the package with:
package modname

// ... package code here
Users can then rely on this package by import-ing it in their Go code with:
import "github.com/someuser/modname"
A Go package can be split into multiple files, all residing within the same directory, e.g.:
project-root-directory/
  go.mod
  modname.go
  modname_test.go
  auth.go
  auth_test.go
  hash.go
  hash_test.go
All the files in the directory declare package modname.
Basic command
A basic executable program (or command-line tool) is structured according to its complexity and code size. The simplest program can consist of a single Go file where func main is defined. Larger programs can have their code split across multiple files, all declaring package main:
project-root-directory/
  go.mod
  auth.go
  auth_test.go
  client.go
  main.go
Here the main.go file contains func main, but this is just a convention. The “main” file can also be called modname.go (for an appropriate value of modname) or anything else.
Assuming this directory is uploaded to a GitHub repository at github.com/someuser/modname, the module line in the go.mod file should say:
module github.com/someuser/modname
And a user should be able to install it on their machine with:
$ go install github.com/someuser/modname@latest
Package or command with supporting packages
Larger packages or commands may benefit from splitting off some functionality into supporting packages. Initially, it’s recommended placing such packages into a directory named internal; this prevents other modules from depending on packages we don’t necessarily want to expose and support for external uses. Since other projects cannot import code from our internal directory, we’re free to refactor its API and generally move things around without breaking external users. The project structure for a package is thus:
project-root-directory/
  internal/
    auth/
      auth.go
      auth_test.go
    hash/
      hash.go
      hash_test.go
  go.mod
  modname.go
  modname_test.go
The modname.go file declares package modname, auth.go declares package auth and so on. modname.go can import the auth package as follows:
import "github.com/someuser/modname/internal/auth"
The layout for a command with supporting packages in an internal directory is very similar, except that the file(s) in the root directory declare package main.
Multiple packages
A module can consist of multiple importable packages; each package has its own directory, and can be structured hierarchically. Here’s a sample project structure:
project-root-directory/
  go.mod
  modname.go
  modname_test.go
  auth/
    auth.go
    auth_test.go
    token/
      token.go
      token_test.go
  hash/
    hash.go
  internal/
    trace/
      trace.go
As a reminder, we assume that the module line in go.mod says:
module github.com/someuser/modname
The modname package resides in the root directory, declares package modname and can be imported by users with:
import "github.com/someuser/modname"
Sub-packages can be imported by users as follows:
import "github.com/someuser/modname/auth"
import "github.com/someuser/modname/auth/token"
import "github.com/someuser/modname/hash"
Package trace that resides in internal/trace cannot be imported outside this module. It’s recommended to keep packages in internal as much as possible.
Multiple commands
Multiple programs in the same repository will typically have separate directories:
project-root-directory/
  go.mod
  internal/
    ... shared internal packages
  prog1/
    main.go
  prog2/
    main.go
In each directory, the program’s Go files declare package main. A top-level internal directory can contain shared packages used by all commands in the repository.
Users can install these programs as follows:
$ go install github.com/someuser/modname/prog1@latest
$ go install github.com/someuser/modname/prog2@latest
A common convention is placing all commands in a repository into a cmd directory; while this isn’t strictly necessary in a repository that consists only of commands, it’s very useful in a mixed repository that has both commands and importable packages, as we will discuss next.
Packages and commands in the same repository
Sometimes a repository will provide both importable packages and installable commands with related functionality. Here’s a sample project structure for such a repository:
project-root-directory/
  go.mod
  modname.go
  modname_test.go
  auth/
    auth.go
    auth_test.go
  internal/
    ... internal packages
  cmd/
    prog1/
      main.go
    prog2/
      main.go
Assuming this module is called github.com/someuser/modname, users can now both import packages from it:
import "github.com/someuser/modname"
import "github.com/someuser/modname/auth"
And install programs from it:
$ go install github.com/someuser/modname/cmd/prog1@latest
$ go install github.com/someuser/modname/cmd/prog2@latest
Server project
Go is a common language choice for implementing servers. There is a very large variance in the structure of such projects, given the many aspects of server development: protocols (REST? gRPC?), deployments, front-end files, containerization, scripts and so on. We will focus our guidance here on the parts of the project written in Go.
Server projects typically won’t have packages for export, since a server is usually a self-contained binary (or a group of binaries). Therefore, it’s recommended to keep the Go packages implementing the server’s logic in the internal directory. Moreover, since the project is likely to have many other directories with non-Go files, it’s a good idea to keep all Go commands together in a cmd directory:
project-root-directory/
  go.mod
  internal/
    auth/
      ...
    metrics/
      ...
    model/
      ...
  cmd/
    api-server/
      main.go
    metrics-analyzer/
      main.go
    ...
  ... the project's other directories with non-Go code
In case the server repository grows packages that become useful for sharing with other projects, it’s best to split these off to separate modules.