MCP in Action
- Introduction
- Model Context Protocol specification
- MCP SDK
- MCP Docs
- MCP Timeline
- Core architecture - Understand how MCP connects clients, servers, and LLMs
- Resources - Expose data and content from your servers to LLMs
- Prompts - Create reusable prompt templates and workflows
- Tools - Enable LLMs to perform actions through your server
- MCP Server Implementation Example
- Best practices
- MCP Go
- How to Use Model Context Protocol (MCP) in Cursor
- TypeScript Example
- MCP Server (第三方服务)
- MCP Roadmap
- Debugging
- Inspector
- Q&A
- TODO
- Refer
Introduction
MCP 起源于 2024 年 11 月 25 日 Anthropic 发布的文章:Introducing the Model Context Protocol。
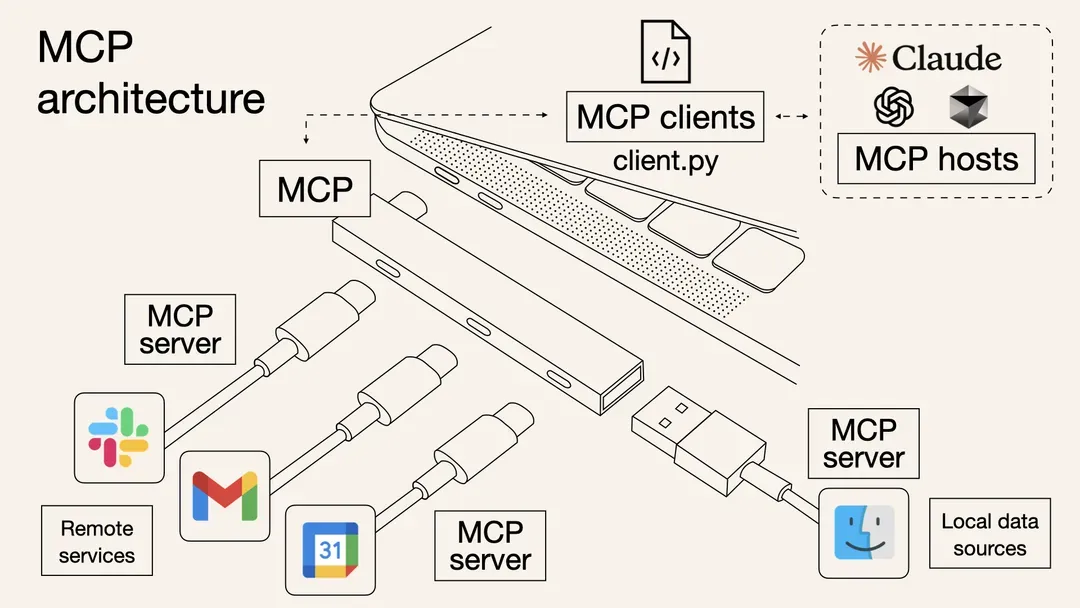
MCPis an open protocol that standardizes how applications provide context to LLMs. Think ofMCPlike aUSB-Cport for AI applications. Just asUSB-Cprovides a standardized way to connect your devices to various peripherals and accessories,MCPprovides a standardized way to connect AI models to different data sources and tools.
大模型很长时间面临认知边界和工具使用的双重约束:其知识体系受限于预训练阶段的静态数据沉淀以及缺少完成任务的工具。而传统 Function Call 存在先天性的不足,线性指令执行机制带来的性能瓶颈与异构接口标准带来的兼容性瓶颈。这种局面在 Anthropic 2024 年 11 月发布 Model Context Protocol 后得到改变,MCP 协议重新定义了大语言模型与现实世界的交互范式。
MCP 的设计遵循微内核架构的设计理念:定义架构和协议标准。号称工具调用的 USB-C 标准。基于这一框架,大语言模型突破了原有束缚:动态语义对齐机制将工具理解准确率提升至新量级,指令编排引擎则实现了高并发任务的智能调度。MCP 通过标准化接口的语义映射能力,将离散的 API 调用转化为具备上下文感知的协作指令集。
例如,如果你有个计算器服务,接入 MCP 后,大模型可以直接调用你的加减乘除功能,而不是生成一段代码让用户去执行。
MCP 旨在建立 LLM 与外部工具和数据交互的标准,让 MCP 充当 LLM 模型的万能转接头,让 LLM 能轻松的获取数据或调用工具。
官方 MCPServer:GitHub - modelcontextprotocol/servers: Model Context Protocol Servers
MCP 的使用场景:
- 开发辅助:
- 根据自然语言描述生成 SQL 语句
- 连接 GitHub 代码库实现代码补全
- 客服系统:调用 CRM 数据库自动回复用户查询
- 智能写作:从本地文件或 API 获取数据生成报告
Model Context Protocol specification
- https://github.com/modelcontextprotocol/modelcontextprotocol
MCP SDK
- https://github.com/modelcontextprotocol/typescript-sdk
- https://modelcontextprotocol.io/quickstart/server#node
- https://github.com/modelcontextprotocol/python-sdk
- https://modelcontextprotocol.io/quickstart/server#python
- https://github.com/modelcontextprotocol/java-sdk
- https://github.com/mark3labs/mcp-go
MCP Docs
- https://github.com/modelcontextprotocol/modelcontextprotocol/tree/main/docs
MCP Timeline
- 2024 年 11 月 24 日
- Anthropic 发布 MCP 协议人工智能公司 Anthropic 首次提出 MCP。旨在为无法直接修改底层逻辑的 Agent (如 Cursor、Claude 桌面端等) 提供工具调用标准。协议允许用户为第三方 Agent 动态接入自定义工具,无需开发者介入。
- 2024 年 12 月
- Claude + MCP 应用案例涌现。技术社区出现首批基于
Claude 3.5 + MCP的应用案例,例如,通过 MCP 协议实现 Claude 与本地文件系统、数据库的自动化交互。开发者工具 Cursor 同期发布 MCP 适配版本,验证了该协议在多工具协作场景的可行性。
- Claude + MCP 应用案例涌现。技术社区出现首批基于
- 2025 年 3月初
- MCP 生态进入规模化应用阶段。开发者工具 Cline、Windsurf 等工具原生支持 MCP 协议。
- 2025 年 3 月 11 日
- LangChain 官方发布核心辩论文章。LangChain 联合创始人 Harrison Chase 与 LangGraph 负责人 Nuno Campos 围绕 MCP 展开激辩。40% 参与者支持 MCP 成为未来标准,33% 的人表示观望。

- 2025 年 3 月 12 日
- 开源社区复现
Manus技术方案。开发者社区组织线上分享会,探讨如何基于 MCP 协议复现 Anthropic 的 Manus 框架 (一种多 Agent 协作系统),进一步推动协议落地应用。
- 开源社区复现
- 2025 年 3 月 17 日
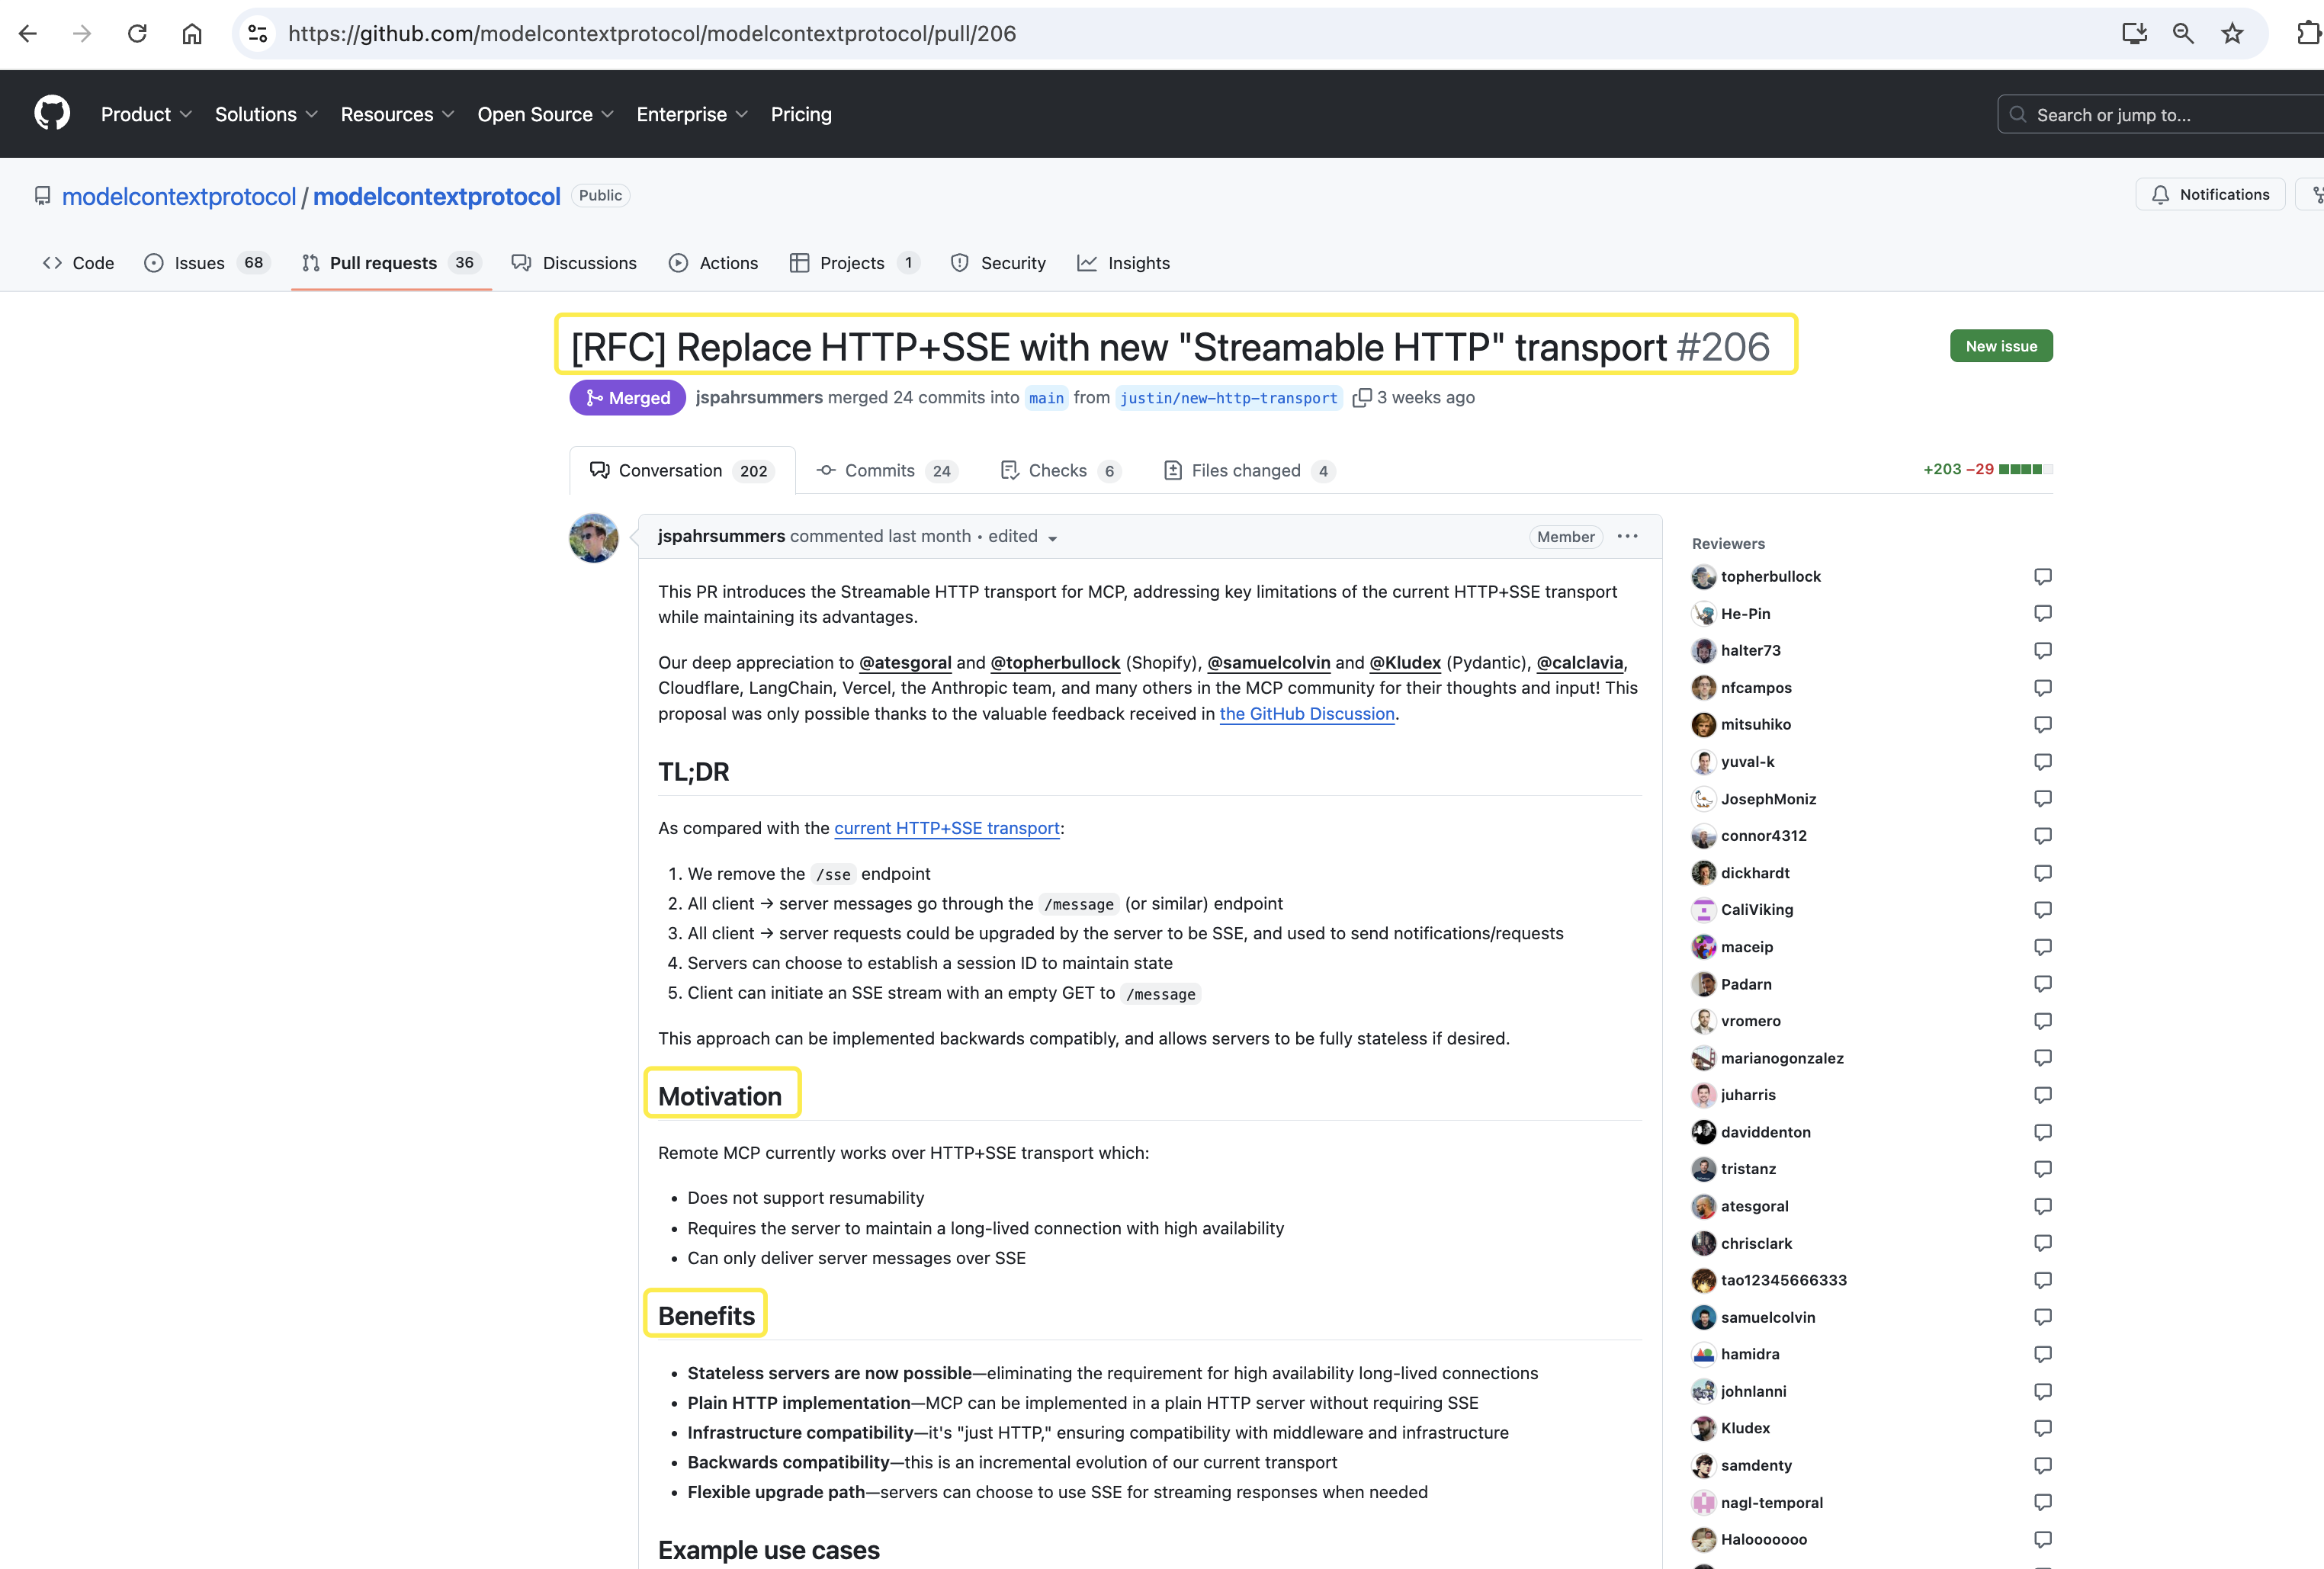
- Anthropic 推出的 MCP 协议新传输方案
Streamable HTTP。该方案彻底重构了通信机制。解决了原HTTP + SSE方案在连接恢复性、服务器负载及双向通信方面的核心瓶颈。 - https://github.com/modelcontextprotocol/modelcontextprotocol/pull/206
- https://modelcontextprotocol.io/specification/2025-03-26#http-with-sse
- Anthropic 推出的 MCP 协议新传输方案
解释:
- 按需建立流式通道:会话初始化阶段仅需常规 HTTP 请求,当检测到需要持续交互(如工具执行进度反馈)时,服务器自动触发 SSE 升级机制。
- 无状态运行支持: 服务器无需长期维护连接状态,处理完请求即可释放资源,适合 Serverless 架构。
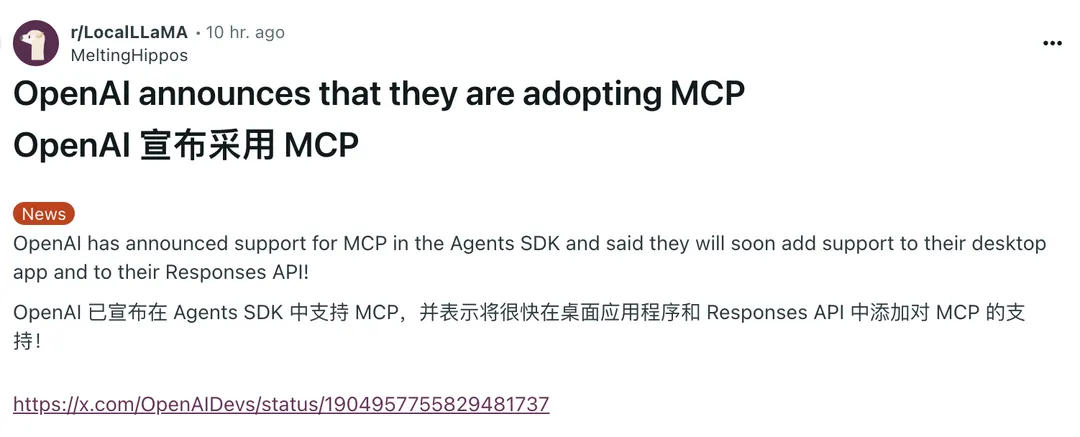
- 2025 年 3 月 27 日
- OpenAI 宣布支持 MCP 协议。
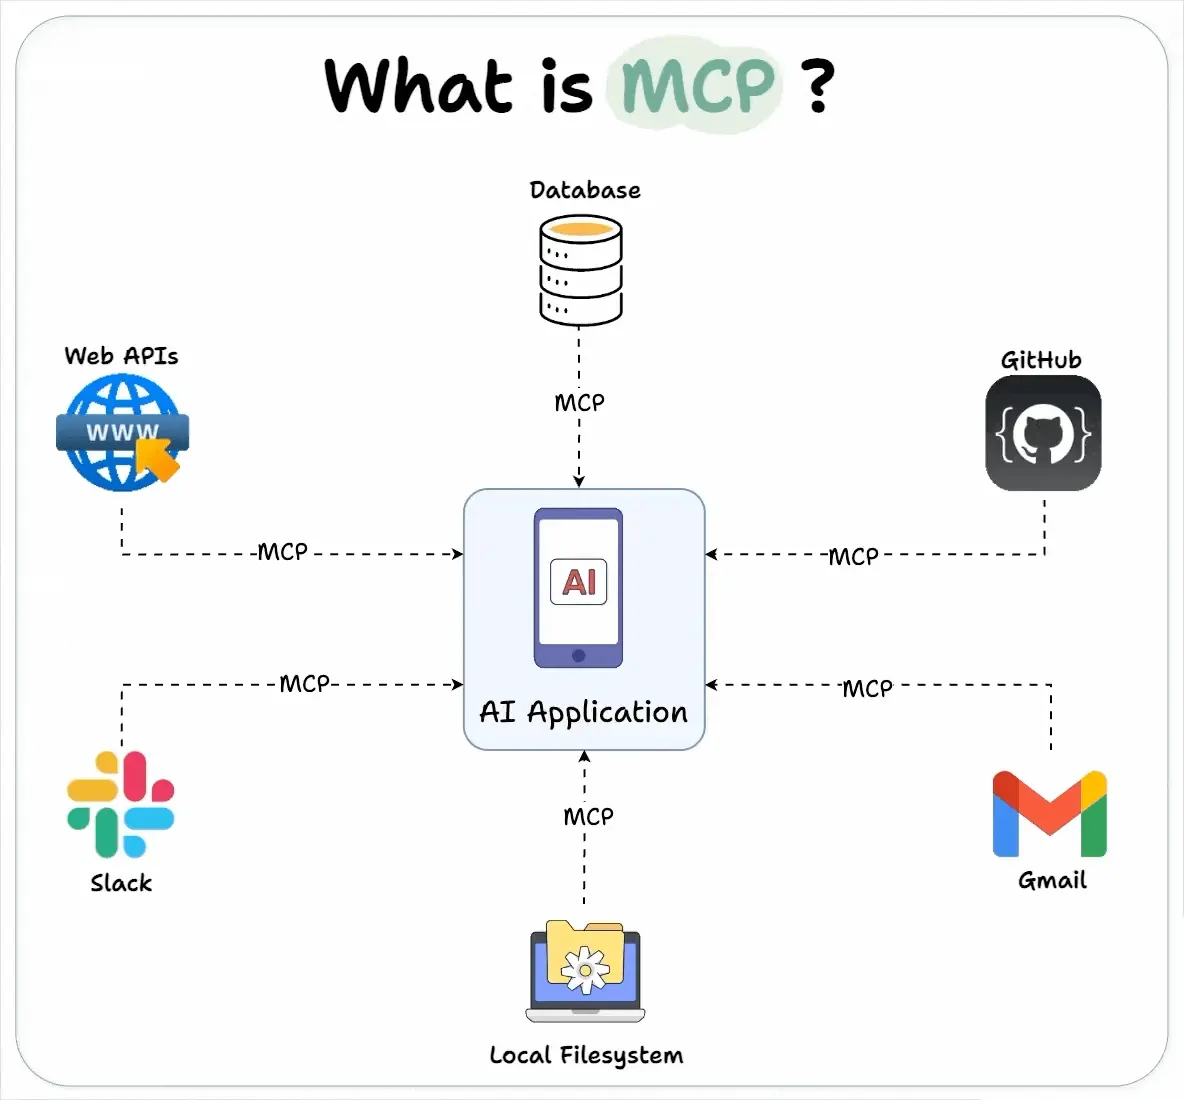
What is MCP?
The Model Context Protocol (MCP) lets you build servers that expose data and functionality to LLM applications in a secure, standardized way. Think of it like a web API, but specifically designed for LLM interactions. MCP servers can:
- Expose data through Resources (think of these sort of like GET endpoints; they are used to load information into the LLM’s context)
- Provide functionality through Tools (sort of like POST endpoints; they are used to execute code or otherwise produce a side effect)
- Define interaction patterns through Prompts (reusable templates for LLM interactions)
- And more!
Why MCP?
MCP helps you build agents and complex workflows on top of LLMs. LLMs frequently need to integrate with data and tools, and MCP provides:
- A growing list of pre-built integrations that your LLM can directly plug into
- The flexibility to switch between LLM providers and vendors
-
Best practices for securing your data within your infrastructure
- 预建集成库
- 提供开箱即用的连接器(如Salesforce、MySQL、天气API),类似“应用商店”,减少重复开发成本。
- 供应商无绑定(Vendor Agnostic)
- 抽象层设计,允许自由切换LLM提供商(如GPT-4 → Claude-3),避免厂商锁定,提升谈判灵活性。
- 安全与隐私
- 遵循零信任原则,数据流经自有基础设施,支持端到端加密、细粒度权限控制,满足企业合规需求(如GDPR)。
Core architecture - Understand how MCP connects clients, servers, and LLMs
At its core, MCP follows a client-server architecture where a host application can connect to multiple servers:
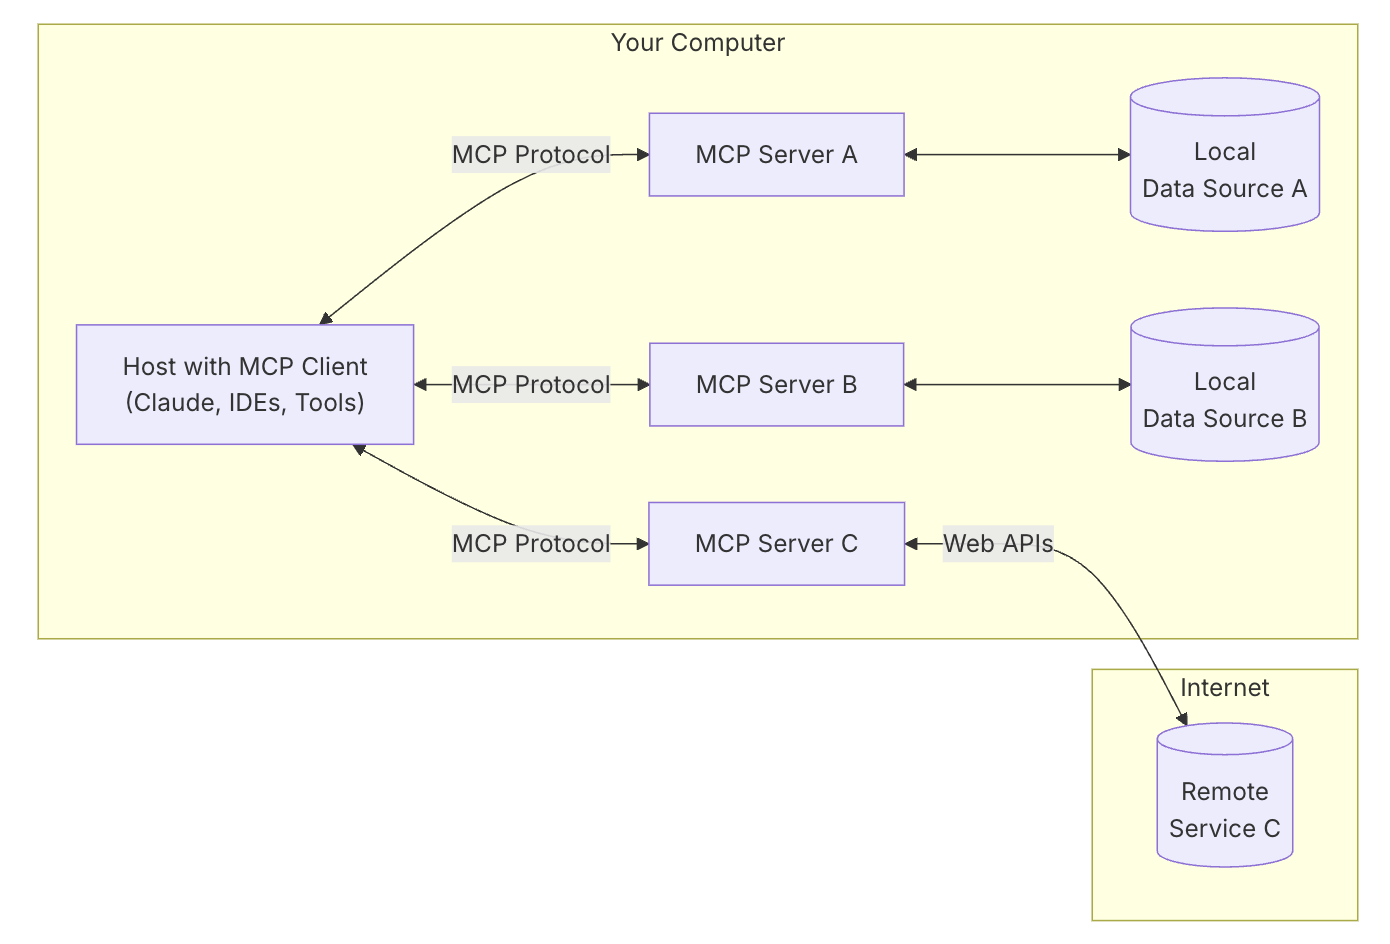
- MCP Hosts: Programs like Claude Desktop, IDEs, or AI tools that want to access data through MCP
- MCP Clients: Protocol clients that maintain 1:1 connections with servers
- MCP Servers: Lightweight programs that each expose specific capabilities through the standardized Model Context Protocol
- Local Data Sources: Your computer’s files, databases, and services that MCP servers can securely access
- Remote Services: External systems available over the internet (e.g., through APIs) that MCP servers can connect to
- MCP Host 作为交互入口,MCP Host 是发起请求的应用,目前 Claude Desktop 和 Cursor 等工具已集成 MCP Host 功能。
- MCP Client 负责维护与 MCP 服务器的连接,并处理请求与响应的转换。
- MCP Server 提供三种主要类型的功能。
- Tools:使大语言模型能够通过你的 Server 执行操作。
- Resources:将 Server 上的数据和内容开放给大语言模型。
- Prompts:创建可复用的提示词模板和工作流程。
支持两种通信方式:
stdio(标准输入输出通信):客户端将 MCP 服务端作为子进程启动,通过 stdio 传输参数和接收结果,适用于本地部署。SSE(HTTP with Server-Sent Events):通过 SSE 长连接进行交互,支持会话管理,适用于远程调用。
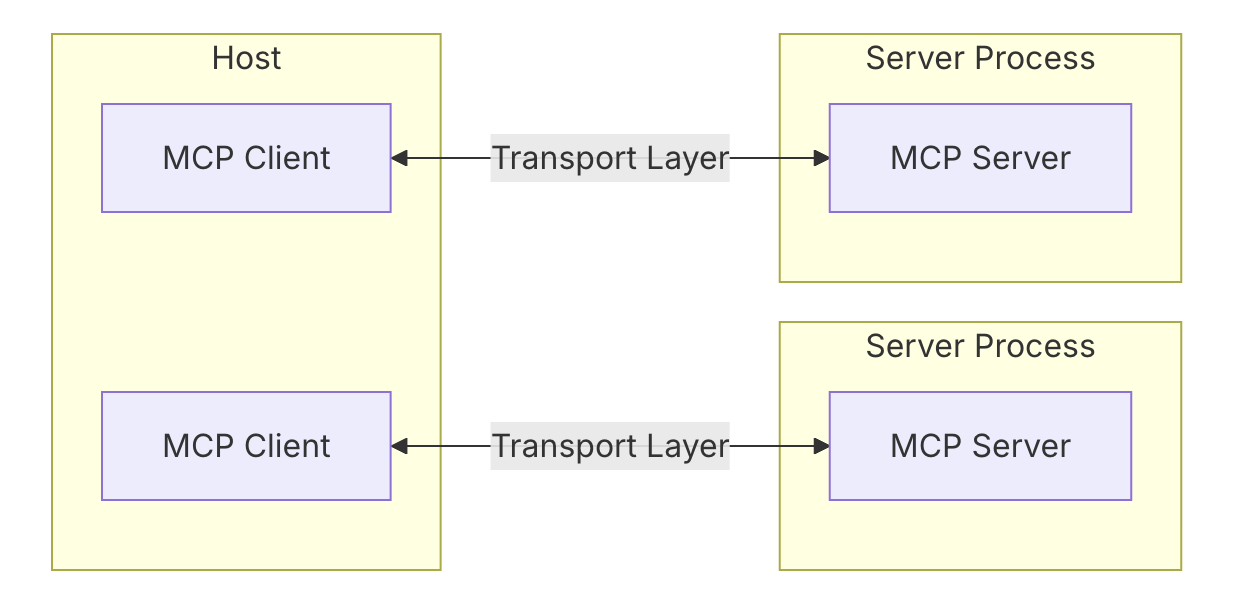
Protocol layer
The protocol layer handles message framing, request/response linking, and high-level communication patterns.
Transport layer
The transport layer handles the actual communication between clients and servers. MCP supports multiple transport mechanisms:
Stdiotransport- Uses standard input/output for communication
- Ideal for local processes
HTTPwithSSEtransport- Uses Server-Sent Events for server-to-client messages
- HTTP POST for client-to-server messages
All transports use JSON-RPC 2.0 to exchange messages. See the specification for detailed information about the Model Context Protocol message format.
Message types
MCP has these main types of messages:
- Requests expect a response from the other side:
interface Request {
  method: string;
  params?: { ... };
}
- Results are successful responses to requests:
interface Result {
  [key: string]: unknown;
}
- Errors indicate that a request failed:
interface Error {
  code: number;
  message: string;
  data?: unknown;
}
- Notifications are one-way messages that don’t expect a response:
interface Notification {
  method: string;
  params?: { ... };
}
Connection lifecycle
* Initialization
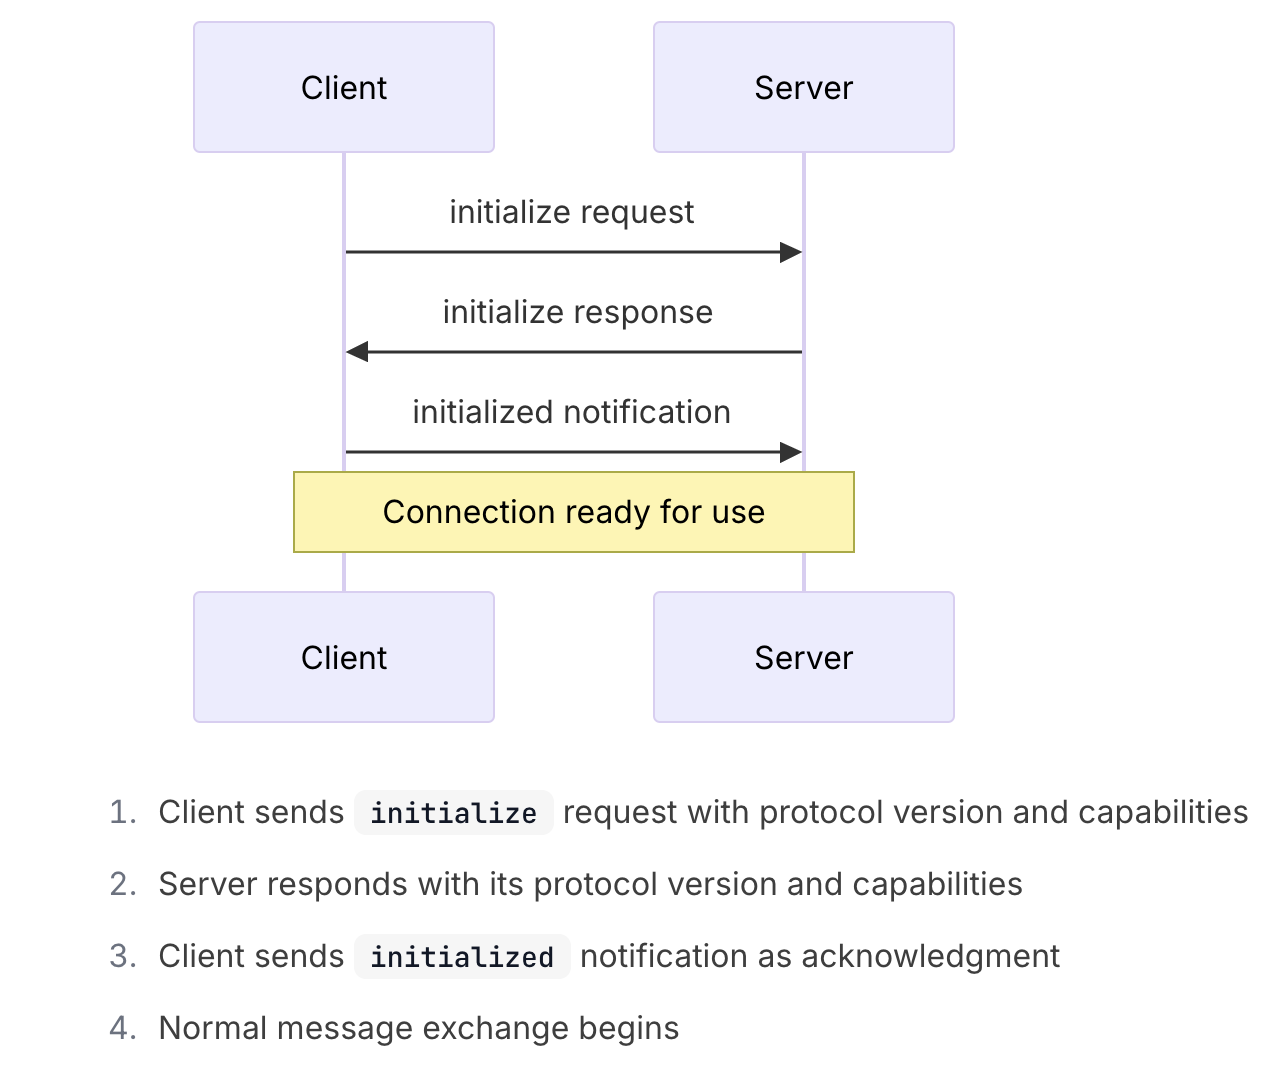
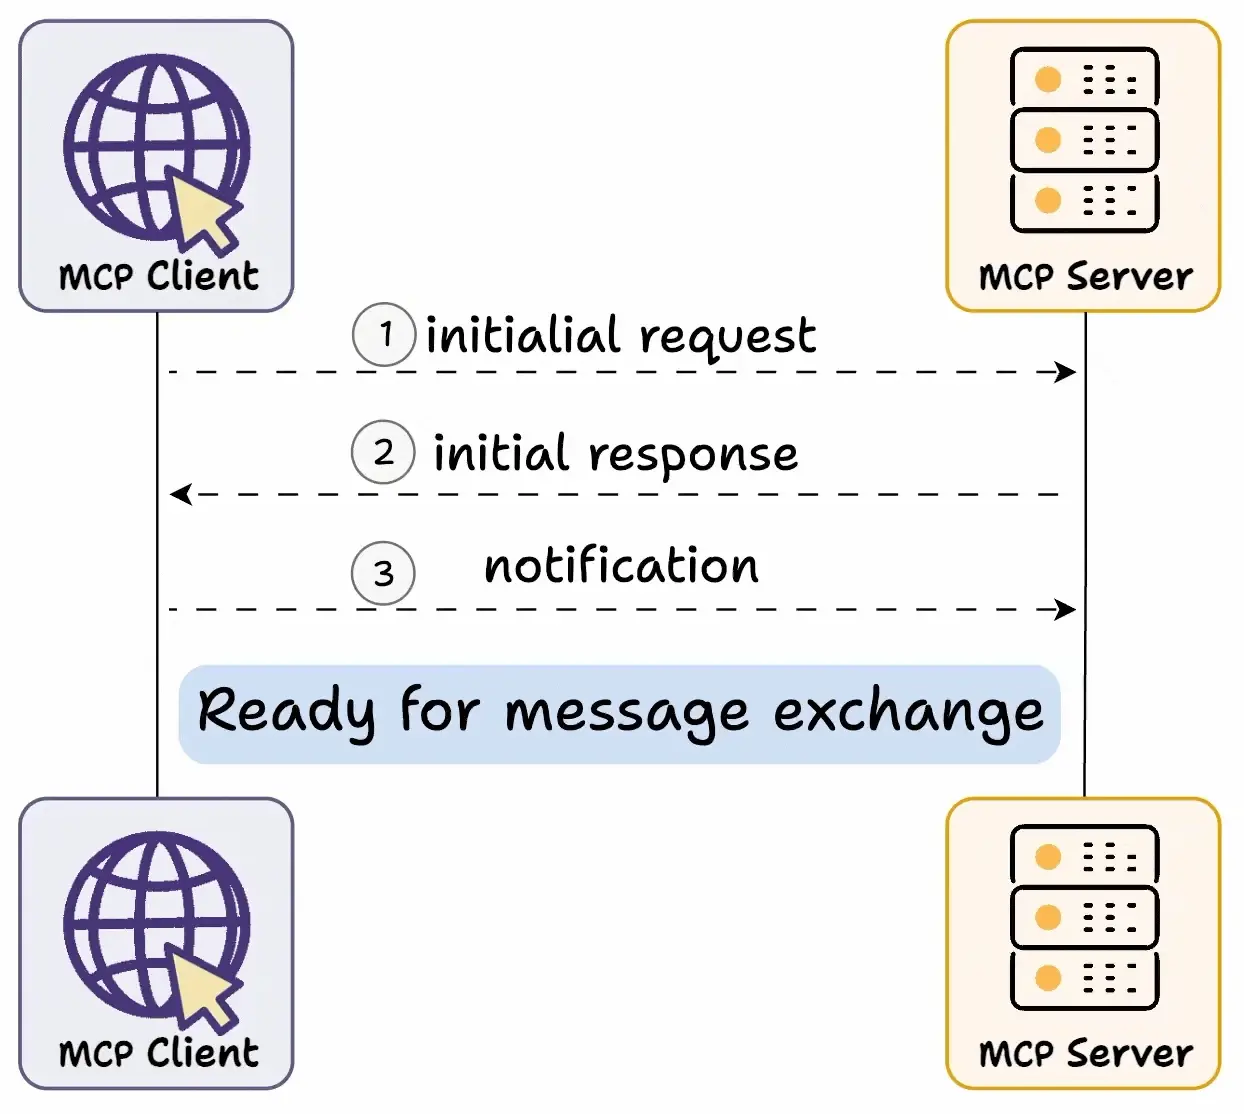
首先进行 Capability Exchange(是一种动态服务发现与适配机制,是 MCP 连接建立的必经步骤,类似于“握手协议”。),流程如下:
- 客户端发送初始请求,获取服务器能力信息
- 服务器返回其能力信息详情
- 例如当天气 API 服务器被调用时,它可以返回可用的
tools、prompts templates及其他资源供客户端使用
* Message exchange
After initialization, the following patterns are supported:
- Request-Response: Client or server sends requests, the other responds
- Notifications: Either party sends one-way messages
* Termination
Either party can terminate the connection:
- Clean shutdown via
close() - Transport disconnection
- Error conditions
Error handling
MCP defines these standard error codes:
enum ErrorCode {
  // Standard JSON-RPC error codes
  ParseError = -32700,
  InvalidRequest = -32600,
  MethodNotFound = -32601,
  InvalidParams = -32602,
  InternalError = -32603
}
SDKs and applications can define their own error codes above -32000.
Errors are propagated through:
- Error responses to requests
- Error events on transports
- Protocol-level error handlers
Resources - Expose data and content from your servers to LLMs
Resources are a core primitive in the Model Context Protocol (MCP) that allow servers to expose data and content that can be read by clients and used as context for LLM interactions.
Resources represent any kind of data that an MCP server wants to make available to clients. This can include:
- File contents
- Database records
- API responses
- Live system data
- Screenshots and images
- Log files
- And more
Each resource is identified by a unique URI and can contain either text or binary data.
Resource URIs
Resources are identified using URIs that follow this format:
[protocol]://[host]/[path]
For example:
1. file:///home/user/documents/report.pdf
2. postgres://database/customers/schema
3. screen://localhost/display1
The protocol and path structure is defined by the MCP server implementation. Servers can define their own custom URI schemes.
Resource types
Resources can contain two types of content:
Text resources
Text resources contain UTF-8 encoded text data. These are suitable for:
- Source code
- Configuration files
- Log files
- JSON/XML data
- Plain text Binary resources
Binary resources contain raw binary data encoded in base64. These are suitable for:
- Images
- PDFs
- Audio files
- Video files
- Other non-text formats
Prompts - Create reusable prompt templates and workflows
Prompts enable servers to define reusable prompt templates and workflows that clients can easily surface to users and LLMs. They provide a powerful way to standardize and share common LLM interactions.
Prompts in MCP are predefined templates that can:
- Accept dynamic arguments
- Include context from resources
- Chain multiple interactions
- Guide specific workflows
- Surface as UI elements (like slash commands)
Prompts in MCP are structured templates that servers provide to standardize interactions with language models. Unlike resources which provide data, or tools which execute actions, prompts define reusable message sequences and workflows that help guide LLM behavior in consistent, predictable ways. They can accept arguments to customize the interaction while maintaining a standardized structure. If you’ve ever researched prompt engineering, you likely have a pretty decent idea of what a prompt is. Creating these within an MCP server allows us to create a space for the prompts we find the most useful to be easily reused and even shared. If you imagine going to a restaurant, a prompt is like a menu item that you can pick from and provide to the waiter. Sometimes, you can customize the menu items by asking to add or remove certain items or to cook the result a particular way. Prompts provided this way serve a similar function.
MCP 中的 Prompts 本质是标准化、可定制的对话蓝图。它们像乐谱一样,既规定了演奏的基本节奏(确保一致性),又允许乐手(LLM)即兴发挥(通过参数注入灵活性)。这种机制能显著提升协作效率并降低模型误用的风险。
Prompt structure
Each prompt is defined with:
{
  name: string;              // Unique identifier for the prompt
  description?: string;      // Human-readable description
  arguments?: [              // Optional list of arguments
    {
      name: string;          // Argument identifier
      description?: string;  // Argument description
      required?: boolean;    // Whether argument is required
    }
  ]
}
Discovering prompts
Clients can discover available prompts through the prompts/list endpoint:
// Request
{
  method: "prompts/list"
}

// Response
{
  prompts: [
    {
      name: "analyze-code",
      description: "Analyze code for potential improvements",
      arguments: [
        {
          name: "language",
          description: "Programming language",
          required: true
        }
      ]
    }
  ]
}
Using prompts
To use a prompt, clients make a prompts/get request:
// Request
{
  method: "prompts/get",
  params: {
    name: "analyze-code",
    arguments: {
      language: "python"
    }
  }
}

// Response
{
  description: "Analyze Python code for potential improvements",
  messages: [
    {
      role: "user",
      content: {
        type: "text",
        text: "Please analyze the following Python code for potential improvements:\n\n```python\ndef calculate_sum(numbers):\n    total = 0\n    for num in numbers:\n        total = total + num\n    return total\n\nresult = calculate_sum([1, 2, 3, 4, 5])\nprint(result)\n```"
      }
    }
  ]
}
Example implementation
Here’s a complete example of implementing prompts in an MCP server:
import { Server } from "@modelcontextprotocol/sdk/server";
import {
  ListPromptsRequestSchema,
  GetPromptRequestSchema
} from "@modelcontextprotocol/sdk/types";

const PROMPTS = {
  "git-commit": {
    name: "git-commit",
    description: "Generate a Git commit message",
    arguments: [
      {
        name: "changes",
        description: "Git diff or description of changes",
        required: true
      }
    ]
  },
  "explain-code": {
    name: "explain-code",
    description: "Explain how code works",
    arguments: [
      {
        name: "code",
        description: "Code to explain",
        required: true
      },
      {
        name: "language",
        description: "Programming language",
        required: false
      }
    ]
  }
};

const server = new Server({
  name: "example-prompts-server",
  version: "1.0.0"
}, {
  capabilities: {
    prompts: {}
  }
});

// List available prompts
server.setRequestHandler(ListPromptsRequestSchema, async () => {
  return {
    prompts: Object.values(PROMPTS)
  };
});

// Get specific prompt
server.setRequestHandler(GetPromptRequestSchema, async (request) => {
  const prompt = PROMPTS[request.params.name];
  if (!prompt) {
    throw new Error(`Prompt not found: ${request.params.name}`);
  }

  if (request.params.name === "git-commit") {
    return {
      messages: [
        {
          role: "user",
          content: {
            type: "text",
            text: `Generate a concise but descriptive commit message for these changes:\n\n${request.params.arguments?.changes}`
          }
        }
      ]
    };
  }

  if (request.params.name === "explain-code") {
    const language = request.params.arguments?.language || "Unknown";
    return {
      messages: [
        {
          role: "user",
          content: {
            type: "text",
            text: `Explain how this ${language} code works:\n\n${request.params.arguments?.code}`
          }
        }
      ]
    };
  }

  throw new Error("Prompt implementation not found");
});
Best practices
When implementing prompts:
- Use clear, descriptive prompt names
- Provide detailed descriptions for prompts and arguments
- Validate all required arguments
- Handle missing arguments gracefully
- Consider versioning for prompt templates
- Cache dynamic content when appropriate
- Implement error handling
- Document expected argument formats
- Consider prompt composability
- Test prompts with various inputs
Tools - Enable LLMs to perform actions through your server
Tools are a powerful primitive in the Model Context Protocol (MCP) that enable servers to expose executable functionality to clients. Through tools, LLMs can interact with external systems, perform computations, and take actions in the real world.
Tools in MCP allow servers to expose executable functions that can be invoked by clients and used by LLMs to perform actions. Key aspects of tools include:
- Discovery: Clients can list available tools through the
tools/listendpoint - Invocation: Tools are called using the
tools/callendpoint, where servers perform the requested operation and return results - Flexibility: Tools can range from simple calculations to complex API interactions
Like resources, tools are identified by unique names and can include descriptions to guide their usage. However, unlike resources, tools represent dynamic operations that can modify state or interact with external systems.
Tool definition structure
Each tool is defined with the following structure:
{
  name: string;          // Unique identifier for the tool
  description?: string;  // Human-readable description
  inputSchema: {         // JSON Schema for the tool's parameters
    type: "object",
    properties: { ... }  // Tool-specific parameters
  },
  annotations?: {        // Optional hints about tool behavior
    title?: string;      // Human-readable title for the tool
    readOnlyHint?: boolean;    // If true, the tool does not modify its environment
    destructiveHint?: boolean; // If true, the tool may perform destructive updates
    idempotentHint?: boolean;  // If true, repeated calls with same args have no additional effect
    openWorldHint?: boolean;   // If true, tool interacts with external entities
  }
}
Implementing tools
Here’s an example of implementing a basic tool in an MCP server:
const server = new Server({
  name: "example-server",
  version: "1.0.0"
}, {
  capabilities: {
    tools: {}
  }
});

// Define available tools
server.setRequestHandler(ListToolsRequestSchema, async () => {
  return {
    tools: [{
      name: "calculate_sum",
      description: "Add two numbers together",
      inputSchema: {
        type: "object",
        properties: {
          a: { type: "number" },
          b: { type: "number" }
        },
        required: ["a", "b"]
      }
    }]
  };
});

// Handle tool execution
server.setRequestHandler(CallToolRequestSchema, async (request) => {
  if (request.params.name === "calculate_sum") {
    const { a, b } = request.params.arguments;
    return {
      content: [
        {
          type: "text",
          text: String(a + b)
        }
      ]
    };
  }
  throw new Error("Tool not found");
});
Example tool patterns
Here are some examples of types of tools that a server could provide:
System operations
Tools that interact with the local system:
{
  name: "execute_command",
  description: "Run a shell command",
  inputSchema: {
    type: "object",
    properties: {
      command: { type: "string" },
      args: { type: "array", items: { type: "string" } }
    }
  }
}
API integrations
Tools that wrap external APIs:
{
  name: "github_create_issue",
  description: "Create a GitHub issue",
  inputSchema: {
    type: "object",
    properties: {
      title: { type: "string" },
      body: { type: "string" },
      labels: { type: "array", items: { type: "string" } }
    }
  }
}
Data processing
Tools that transform or analyze data:
{
  name: "analyze_csv",
  description: "Analyze a CSV file",
  inputSchema: {
    type: "object",
    properties: {
      filepath: { type: "string" },
      operations: {
        type: "array",
        items: {
          enum: ["sum", "average", "count"]
        }
      }
    }
  }
}
Best practices
When implementing tools:
- Provide clear, descriptive names and descriptions
- Use detailed JSON Schema definitions for parameters
- Include examples in tool descriptions to demonstrate how the model should use them
- Implement proper error handling and validation
- Use progress reporting for long operations
- Keep tool operations focused and atomic
- Document expected return value structures
- Implement proper timeouts
- Consider rate limiting for resource-intensive operations
- Log tool usage for debugging and monitoring
MCP Server Implementation Example
Here’s a basic example of implementing an MCP server:
import { Server } from "@modelcontextprotocol/sdk/server/index.js";
import { StdioServerTransport } from "@modelcontextprotocol/sdk/server/stdio.js";

const server = new Server({
  name: "example-server",
  version: "1.0.0"
}, {
  capabilities: {
    resources: {}
  }
});

// Handle requests
server.setRequestHandler(ListResourcesRequestSchema, async () => {
  return {
    resources: [
      {
        uri: "example://resource",
        name: "Example Resource"
      }
    ]
  };
});

// Connect transport
const transport = new StdioServerTransport();
await server.connect(transport);
Best practices
Transport selection
- Local communication
- Use stdio transport for local processes
- Efficient for same-machine communication
- Simple process management
- Remote communication
- Use SSE for scenarios requiring HTTP compatibility
- Consider security implications including authentication and authorization
Message handling
- Request processing
- Validate inputs thoroughly
- Use type-safe schemas
- Handle errors gracefully
- Implement timeouts
- Progress reporting
- Use progress tokens for long operations
- Report progress incrementally
- Include total progress when known
- Error management
- Use appropriate error codes
- Include helpful error messages
- Clean up resources on errors
Security considerations
- Transport security
- Use TLS for remote connections
- Validate connection origins
- Implement authentication when needed
- Message validation
- Validate all incoming messages
- Sanitize inputs
- Check message size limits
- Verify JSON-RPC format
- Resource protection
- Implement access controls
- Validate resource paths
- Monitor resource usage
- Rate limit requests
- Error handling
- Don’t leak sensitive information
- Log security-relevant errors
- Implement proper cleanup
- Handle DoS scenarios
Debugging and monitoring
- Logging
- Log protocol events
- Track message flow
- Monitor performance
- Record errors
- Diagnostics
- Implement health checks
- Monitor connection state
- Track resource usage
- Profile performance
- Testing
- Test different transports
- Verify error handling
- Check edge cases
- Load test servers
MCP Go
A Go implementation of the Model Context Protocol (MCP), enabling seamless integration between LLM applications and external data sources and tools.
package main

import (
    "context"
    "errors"
    "fmt"

    "github.com/mark3labs/mcp-go/mcp"
    "github.com/mark3labs/mcp-go/server"
)

func main() {
    // Create MCP server
    s := server.NewMCPServer(
        "Demo 🚀",
        "1.0.0",
    )

    // Add tool
    tool := mcp.NewTool("hello_world",
        mcp.WithDescription("Say hello to someone"),
        mcp.WithString("name",
            mcp.Required(),
            mcp.Description("Name of the person to greet"),
        ),
    )

    // Add tool handler
    s.AddTool(tool, helloHandler)

    // Start the stdio server
    if err := server.ServeStdio(s); err != nil {
        fmt.Printf("Server error: %v\n", err)
    }
}

func helloHandler(ctx context.Context, request mcp.CallToolRequest) (*mcp.CallToolResult, error) {
    name, ok := request.Params.Arguments["name"].(string)
    if !ok {
        return nil, errors.New("name must be a string")
    }

    return mcp.NewToolResultText(fmt.Sprintf("Hello, %s!", name)), nil
}
That’s it!
MCP Go handles all the complex protocol details and server management, so you can focus on building great tools. It aims to be high-level and easy to use.
Key features:
- Fast: High-level interface means less code and faster development
- Simple: Build MCP servers with minimal boilerplate
- Complete: MCP Go aims to provide a full implementation of the core MCP specification
How to Use Model Context Protocol (MCP) in Cursor
Installation Steps
- Open Cursor Settings
- Navigate to
Cursor Settings>Features>MCP - Click the
+ Add New MCP Serverbutton
- Navigate to
- Configure the Server
- Name: Give your server a nickname
- Type: Select the transport type (
stdioorsse) - Command/URL: Enter either:
- For
SSEservers: The URL of the SSE endpoint - For
stdioservers: A valid shell command to run the server
- For
在 Cursor 中添加 MCP server:

Example Configurations:
# For stdio Server (Weather Server Example):
Command: node ~/mcp-quickstart/weather-server-typescript/build/index.js
# For SSE Server:
URL: http://example.com:8000/sse
stdio 完整的配置示例:
{
  "mcpServers": {
    "weather": {
      "command": "/data/home/gerryyang/.local/bin/uv",
      "args": ["--directory", "/data/home/gerryyang/mcp/demo/python-demo/weather", "run", "weather.py"]
    }
  }
}
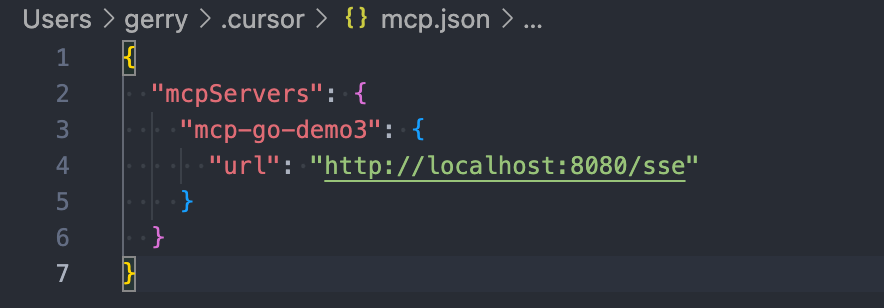
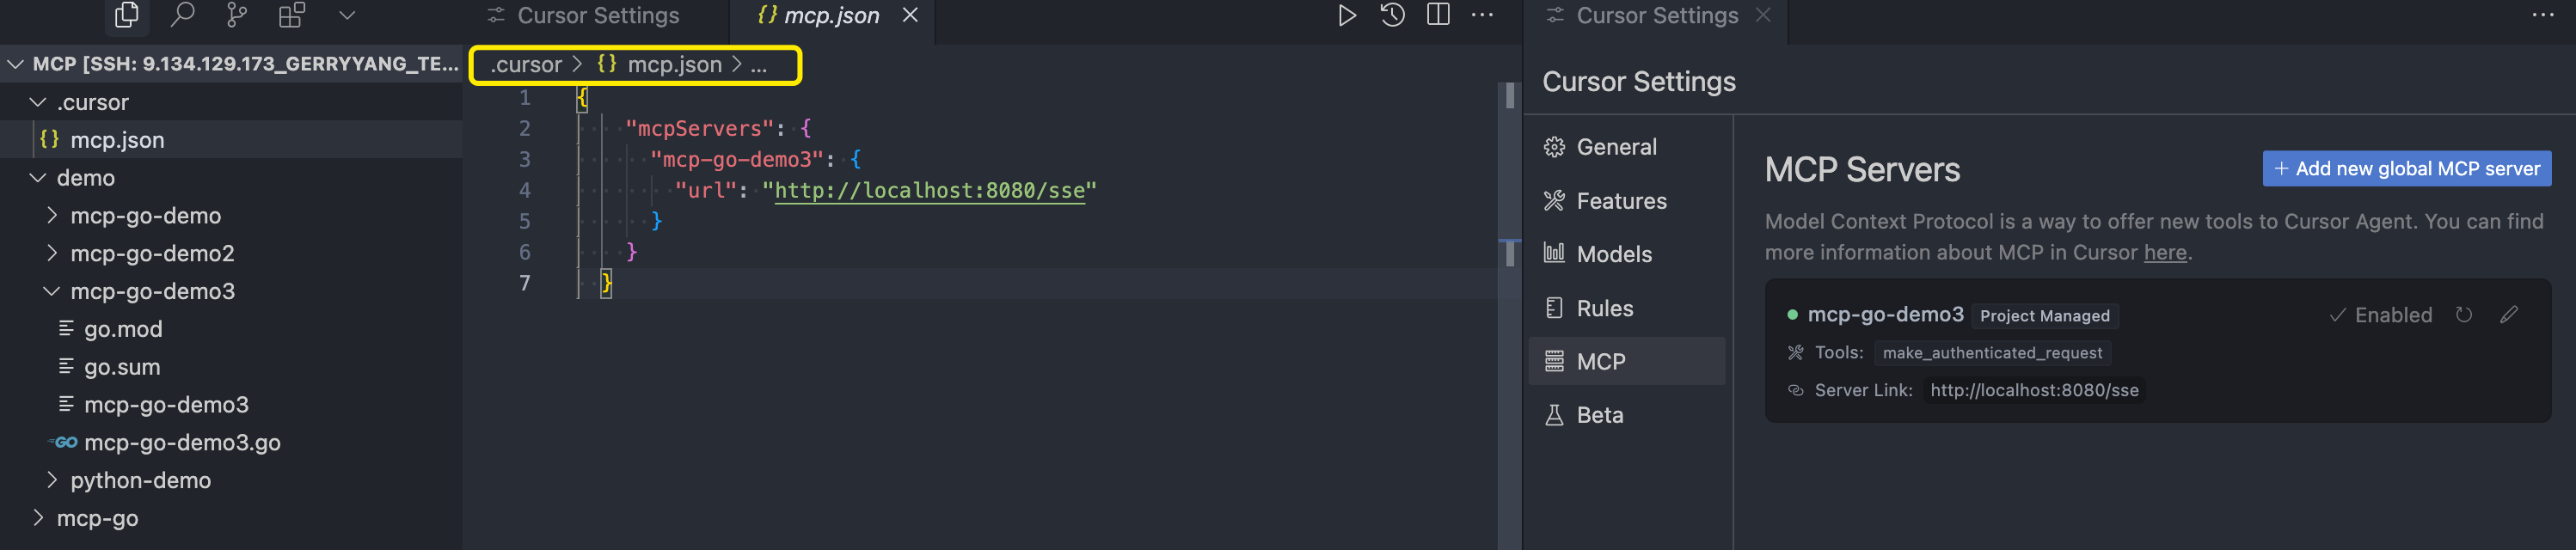
sse 完整的配置示例:
{
"mcpServers": {
"calculate": {
"description": "mcp-go-demo2: Calculate the sum of two numbers",
"url": "http://localhost:8080/sse"
},
"make_authenticated_request": {
"description": "mcp-go-demo3: Make an authenticated request to the API",
"url": "http://localhost:8080/sse"
},
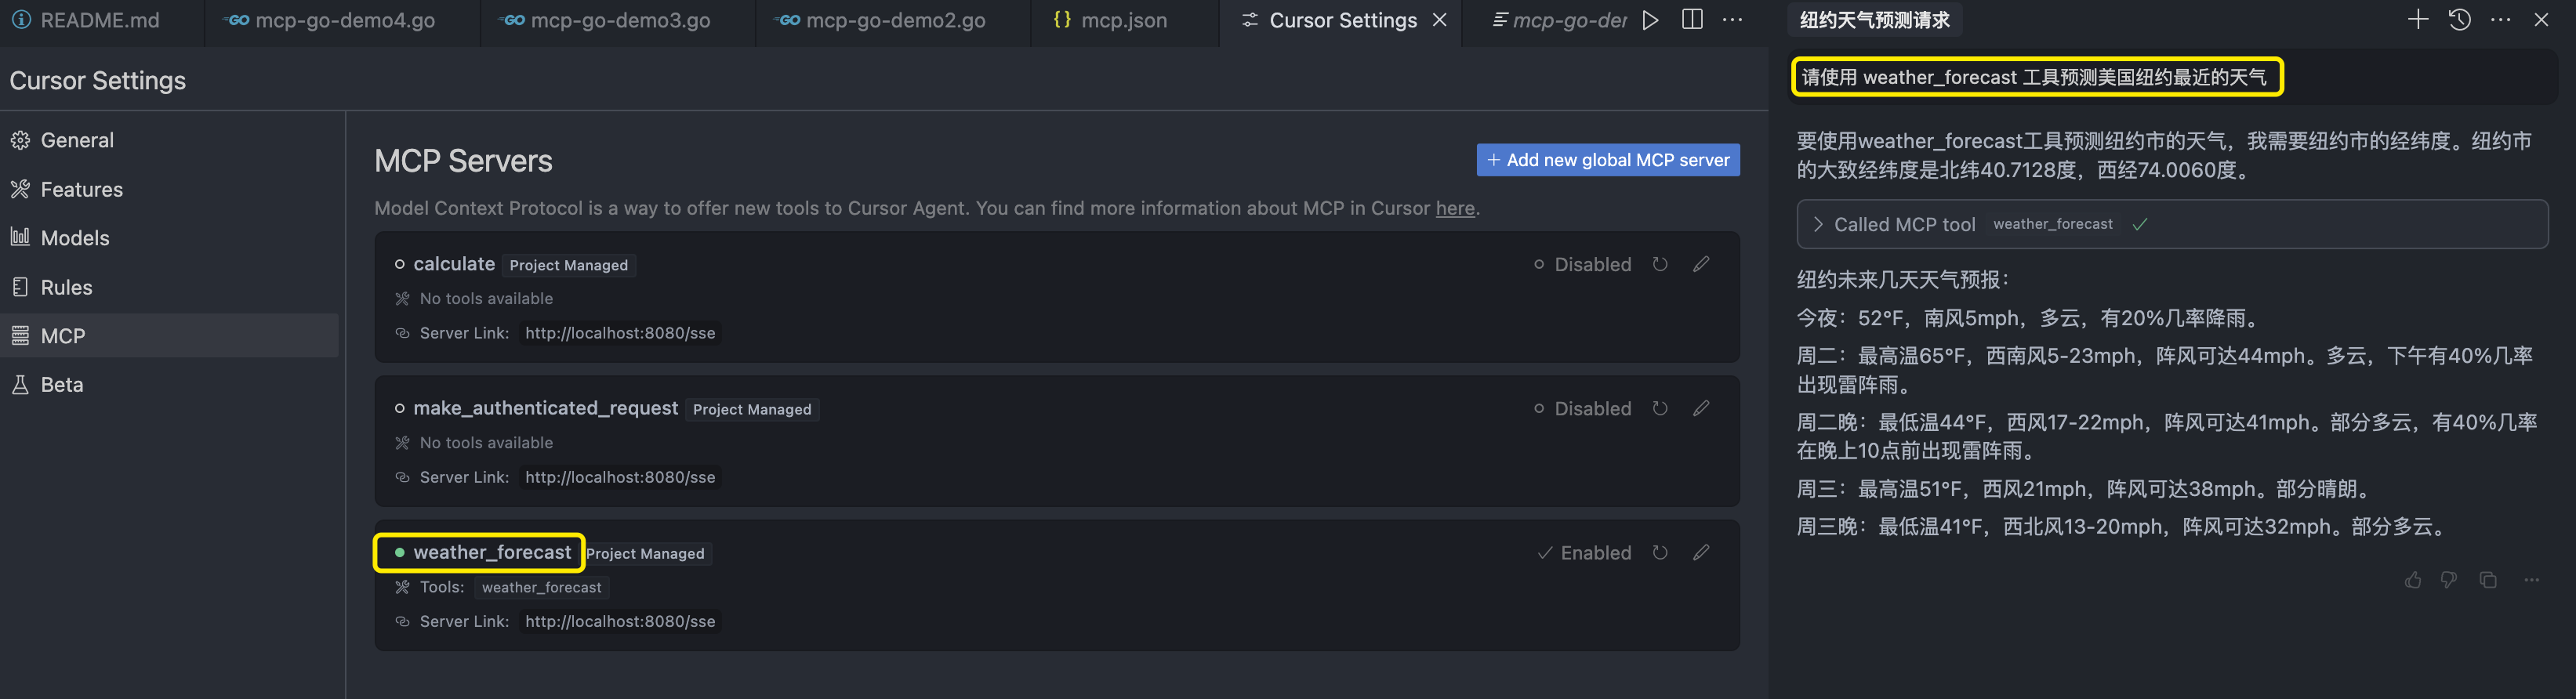
"weather_forecast": {
"description": "mcp-go-demo4: Weather server",
"url": "http://localhost:8080/sse"
}
}
}
Using MCP Tools
- Tool Availability
- After adding a server, it will appear in your MCP servers list
- You may need to click the refresh button to populate (增添数据) the tool list
- Using Tools in Composer
- The Composer Agent automatically uses MCP tools when relevant
- You can explicitly prompt tool usage by:
- Referring to the tool by name
- Describing the tool’s function
- Tool Execution Process
- Displays a message in chat requesting approval
- Shows tool call arguments (expandable)
- Executes the tool upon user approval
- Displays the tool’s response in the chat
Important Notes
- MCP tools may not work with all models
- MCP tools are only available to the Agent in Composer
- For servers requiring environment variables, create a wrapper script that sets the variables before running the server
Examples
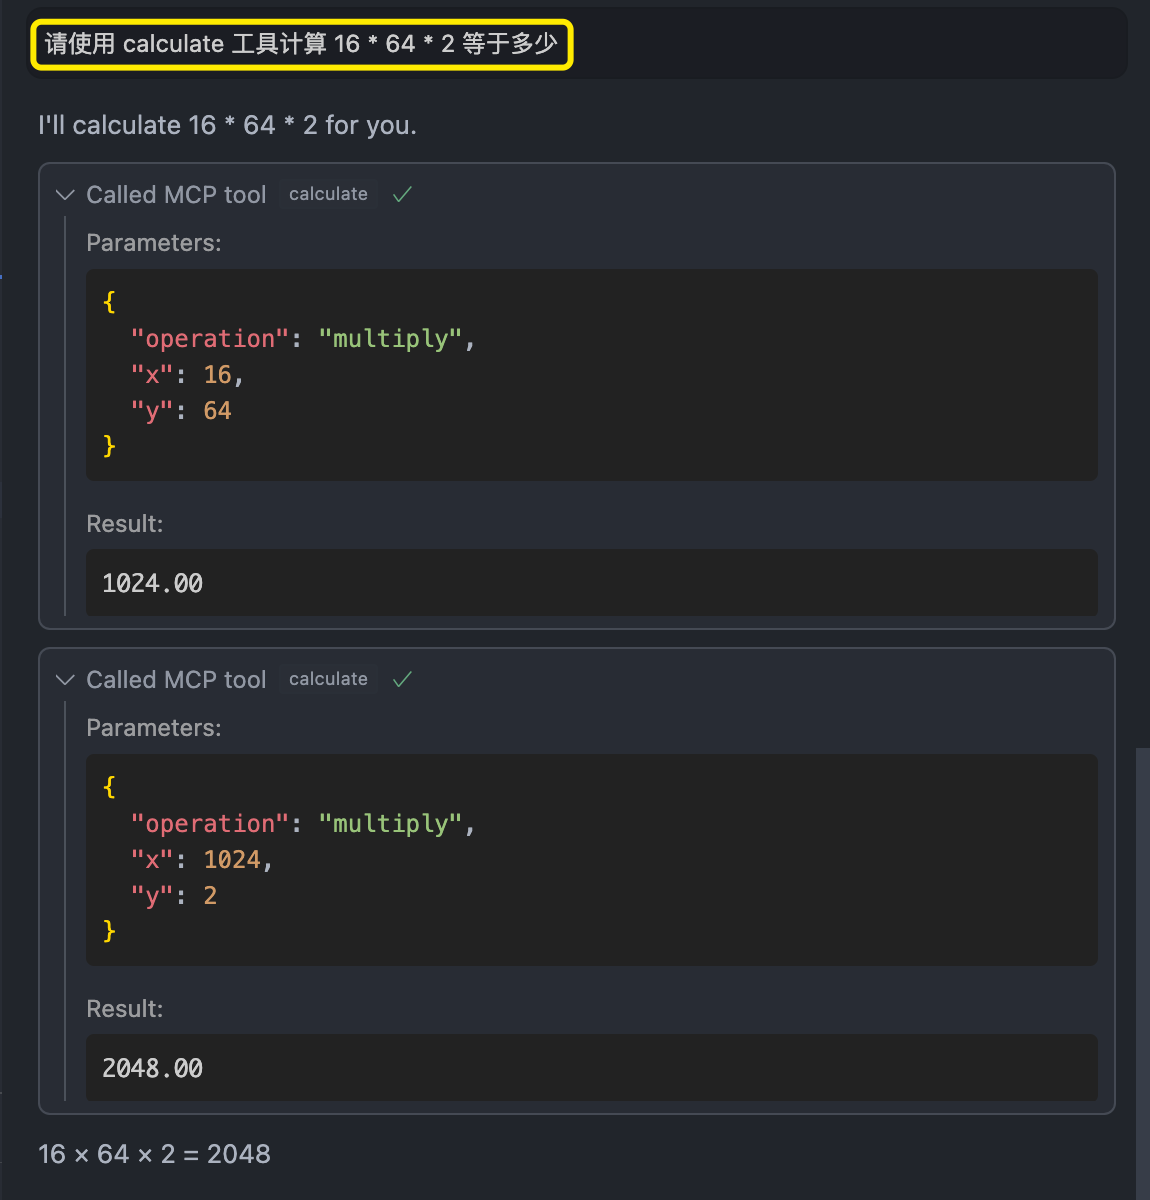
以下测试通过 Cursor (Agent claude-3.7-sonnet) 模式配置使用基于 mcp-go 开发的 MCP Server。
mcp.json配置中mcpServers下的服务名为mcp.NewTool的第一个参数名。- MCP 服务支持两种调用方式:
stdio和sse,不同的调用方式在mcp.json中配置格式不同。其中stdio配置为command;sse配置为url。 - 测试 MCP 服务可以通过显式指定 MCP 服务的名字执行相关任务,或者大模型会根据相关性来选择要调用的 MCP 服务。例如:请使用
calculate工具计算16 * 64 * 2等于多少。
完整配置:
{
    "mcpServers": {
      "calculate": {
        "description": "mcp-go-demo2: Calculate the sum of two numbers",
        "url": "http://localhost:8080/sse"
      },
      "make_authenticated_request": {
        "description": "mcp-go-demo3: Make an authenticated request to the API",
        "url": "http://localhost:8080/sse"
      },
      "weather_forecast": {
        "description": "mcp-go-demo4: Weather server",
        "url": "http://localhost:8080/sse"
      }
    }
}
mcp-go Calculator (stdio / sse)
https://github.com/mark3labs/mcp-go
简单的计算,只用调用一次工具。

可以发现对于复杂运算会通过多次调用工具来完成。
package main

import (
	"context"
	"errors"
	"flag"
	"fmt"
	"log"

	"github.com/mark3labs/mcp-go/mcp"
	"github.com/mark3labs/mcp-go/server"
)

func handleCalculateTool(
	ctx context.Context,
	request mcp.CallToolRequest,
) (*mcp.CallToolResult, error) {
	op := request.Params.Arguments["operation"].(string)
	x := request.Params.Arguments["x"].(float64)
	y := request.Params.Arguments["y"].(float64)

	var result float64
	switch op {
	case "add":
		result = x + y
	case "subtract":
		result = x - y
	case "multiply":
		result = x * y
	case "divide":
		if y == 0 {
			return nil, errors.New("cannot divide by zero")
		}
		result = x / y
	}

	return mcp.NewToolResultText(fmt.Sprintf("%.2f", result)), nil
}

type MCPServer struct {
	server *server.MCPServer
}

func NewMCPServer() *MCPServer {

	mcpServer := server.NewMCPServer(
		"calculator",
		"1.0.0",
		server.WithResourceCapabilities(true, true),
		server.WithLogging(),
		server.WithRecovery(),
	)
	mcpServer.AddTool(mcp.NewTool("calculate",
		mcp.WithDescription("Perform basic arithmetic operations"),
		mcp.WithString("operation",
			mcp.Required(),
			mcp.Description("The operation to perform (add, subtract, multiply, divide)"),
			mcp.Enum("add", "subtract", "multiply", "divide"),
		),
		mcp.WithNumber("x",
			mcp.Required(),
			mcp.Description("First number"),
		),
		mcp.WithNumber("y",
			mcp.Required(),
			mcp.Description("Second number"),
		),
	), handleCalculateTool)

	return &MCPServer{
		server: mcpServer,
	}
}

func (s *MCPServer) ServeSSE(addr string) *server.SSEServer {
	return server.NewSSEServer(s.server, server.WithBaseURL(fmt.Sprintf("http://%s", addr)))
}

func (s *MCPServer) ServeStdio() error {
	return server.ServeStdio(s.server)
}

func main() {
	var transport string
	flag.StringVar(&transport, "t", "stdio", "Transport type (stdio or sse)")
	flag.Parse()

	s := NewMCPServer()

	switch transport {
	case "stdio":
		if err := s.ServeStdio(); err != nil {
			log.Fatalf("Server error: %v", err)
		}
	case "sse":
		sseServer := s.ServeSSE("localhost:8080")
		log.Printf("SSE server listening on :8080")
		if err := sseServer.Start(":8080"); err != nil {
			log.Fatalf("Server error: %v", err)
		}
	default:
		log.Fatalf(
			"Invalid transport type: %s. Must be 'stdio' or 'sse'",
			transport,
		)
	}
}
go mod init mcp-go-demo
go mod tidy
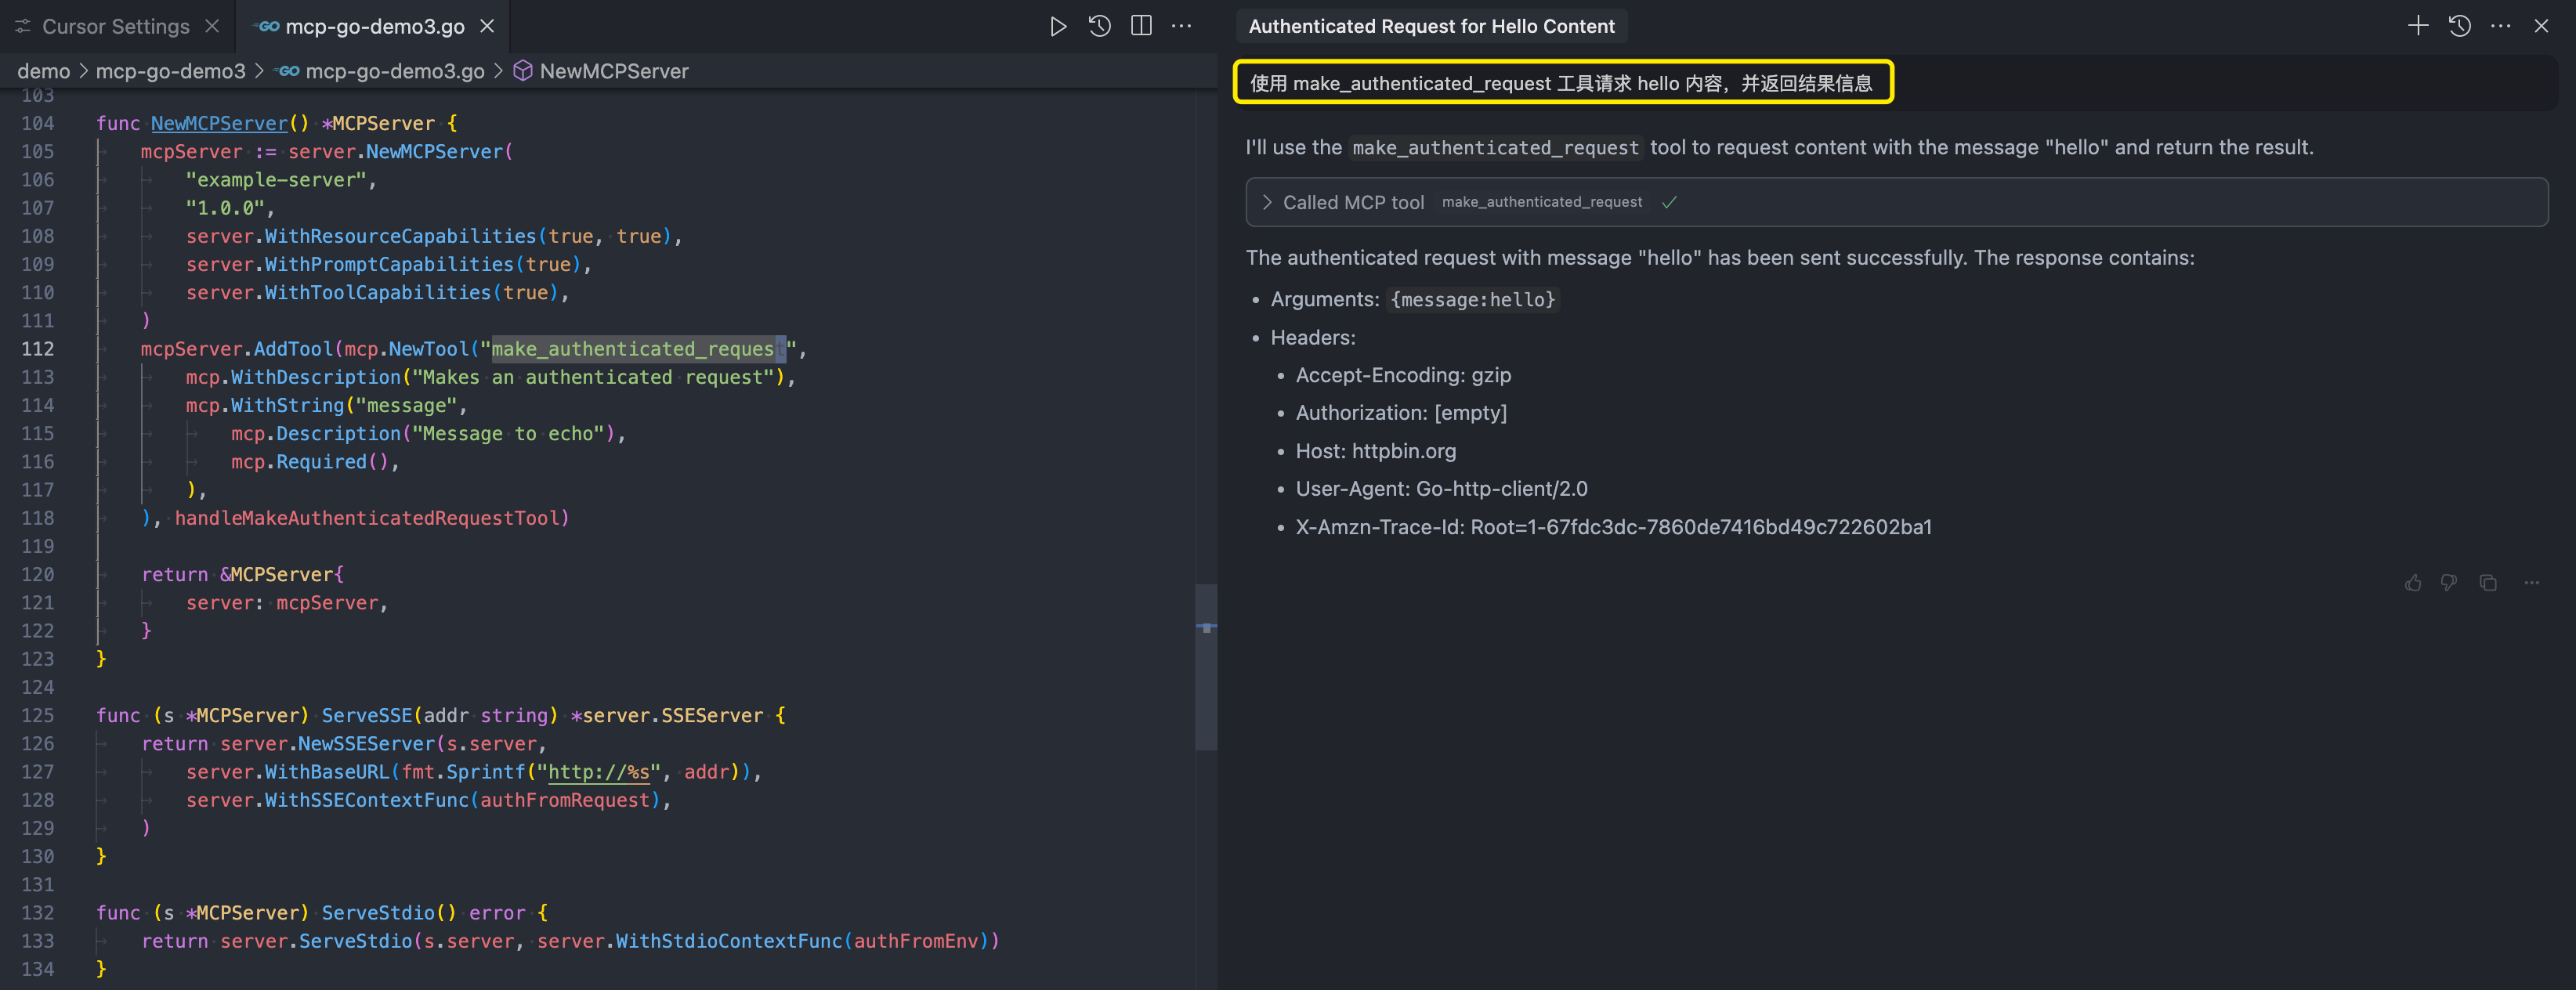
mcp-go custom_context (stdio / sse)
https://github.com/mark3labs/mcp-go/tree/main/examples/custom_context
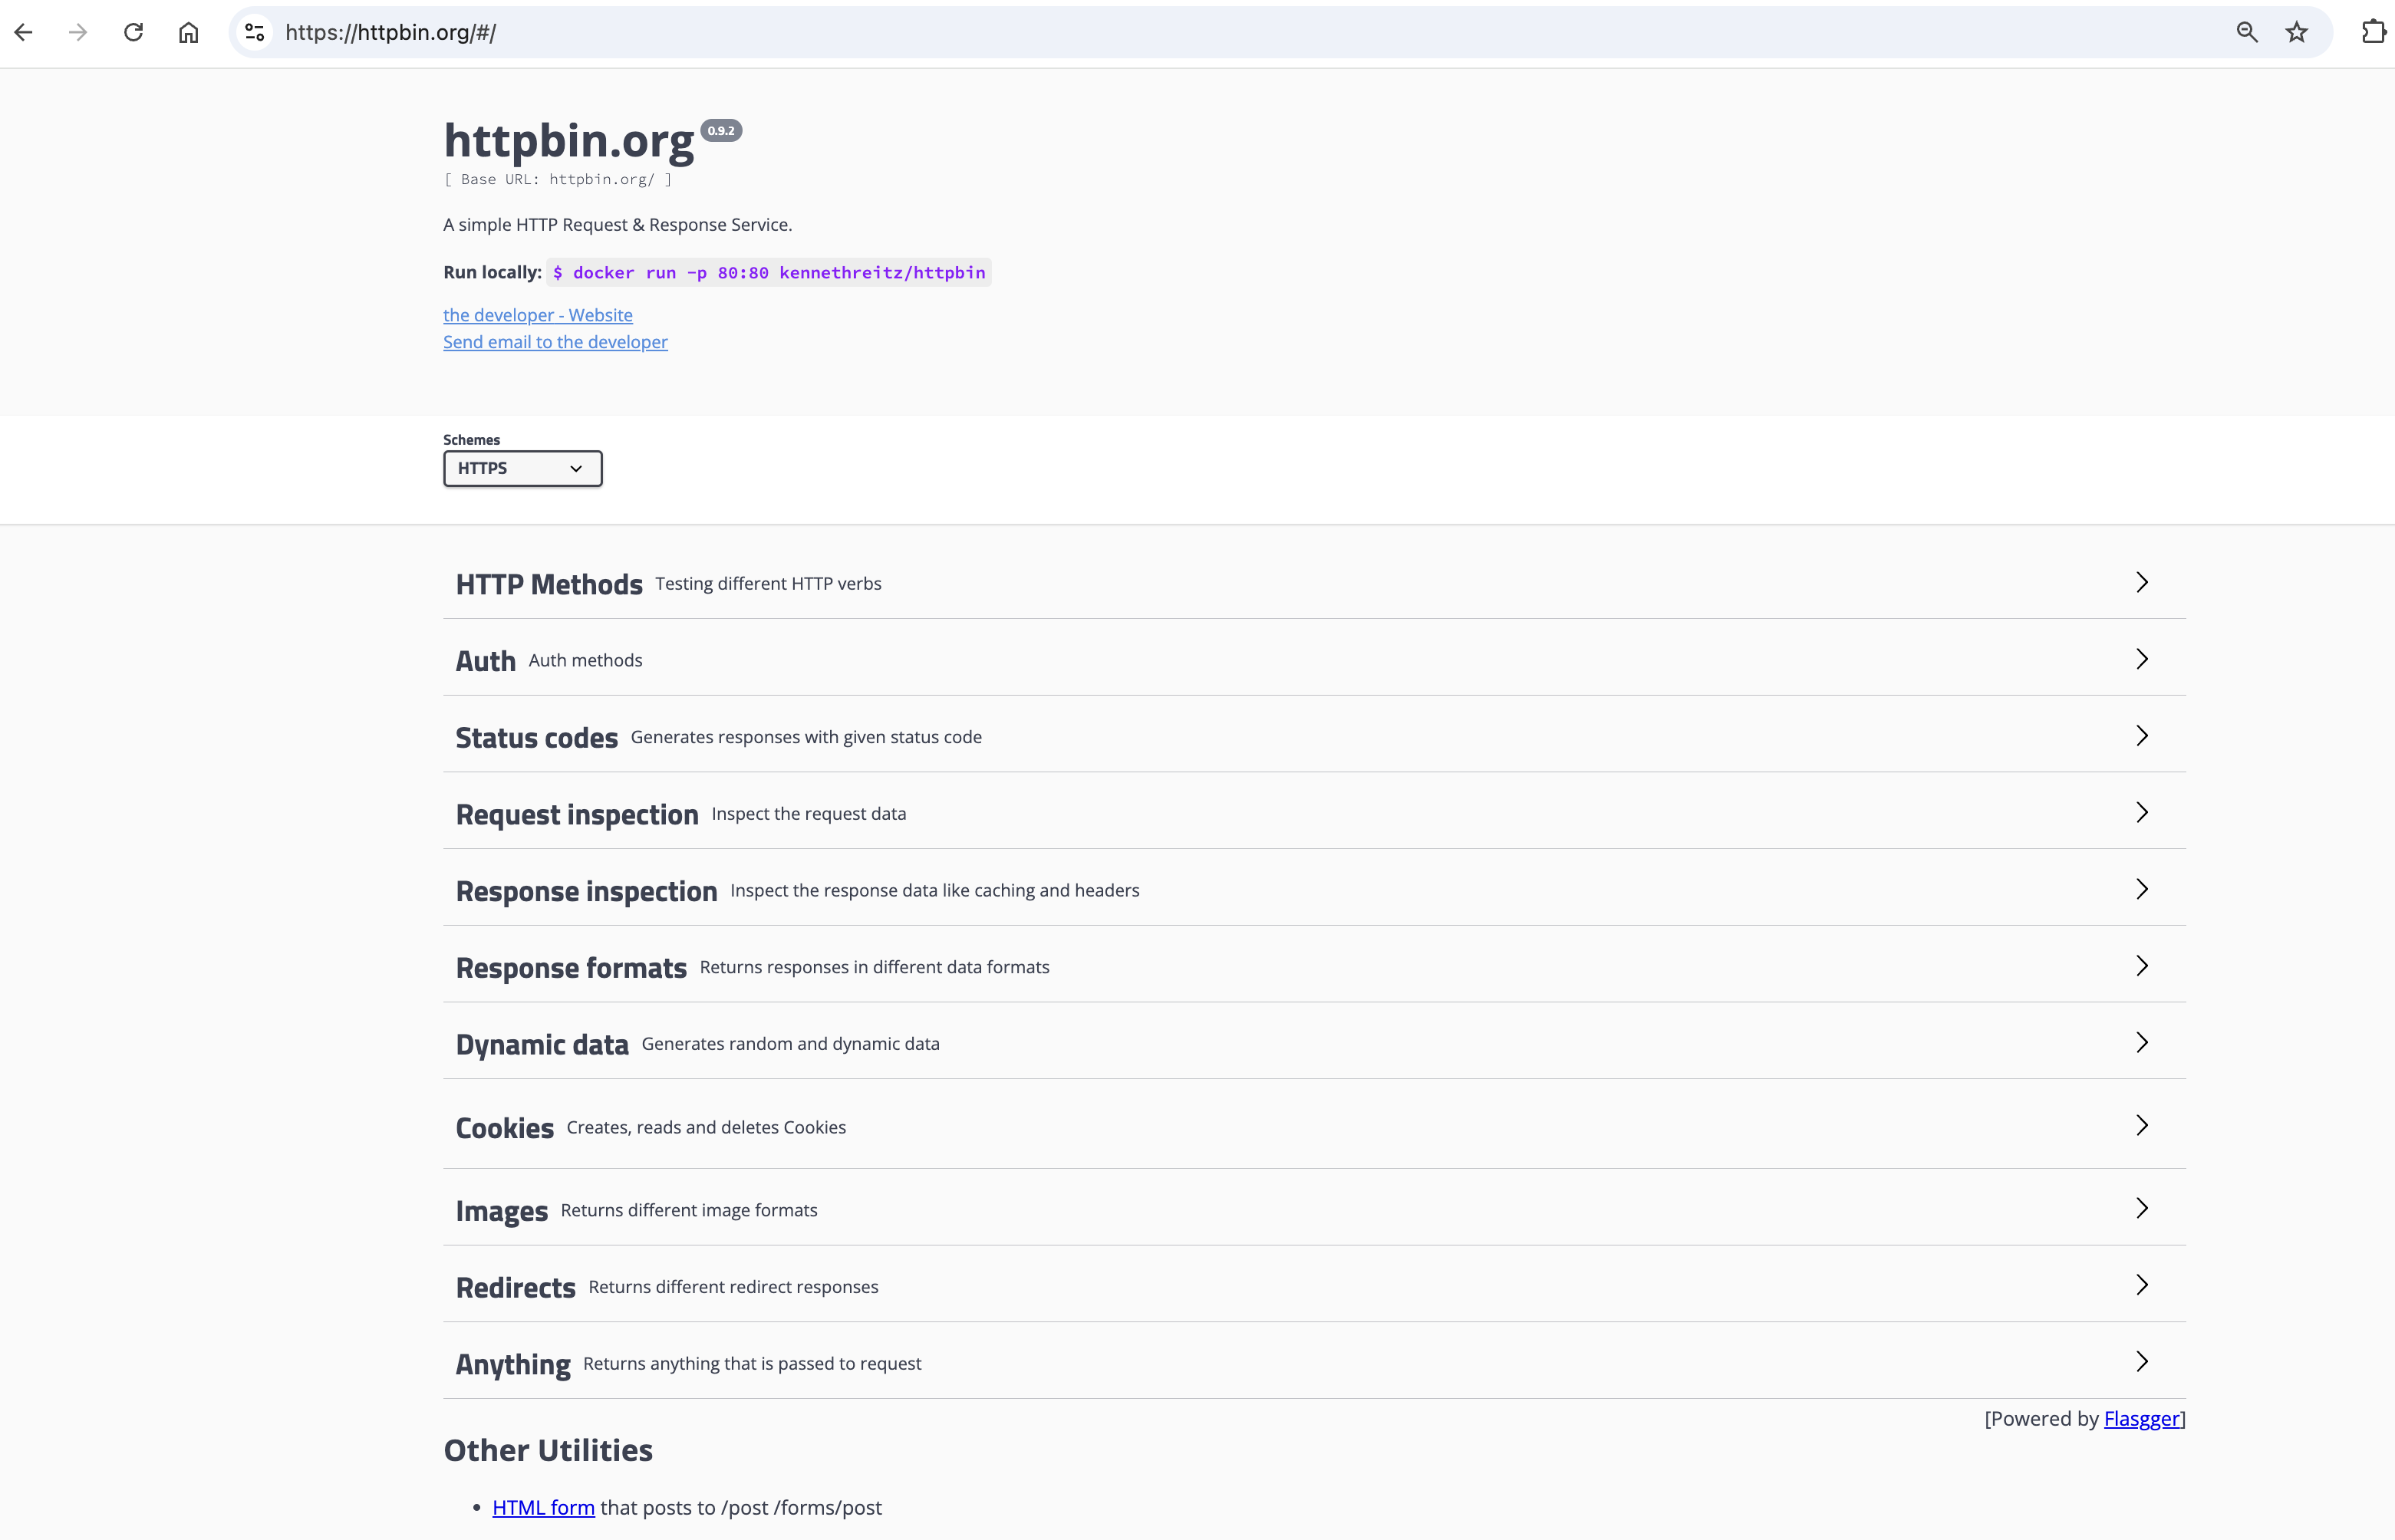
The web https://httpbin.org/ is a simple HTTP Request & Response Service.
# /anything Returns anything passed in request data.
curl -X GET "https://httpbin.org/anything" -H "accept: application/json"
在 MacOS 环境下,全局配置路径为 /Users/gerry/.cursor/mcp.json,也可以设置只在当前的工程使用的配置 .cursor/mcp.json
通过显式指定 MCP tool 的名字测试:
package main

import (
	"context"
	"encoding/json"
	"flag"
	"fmt"
	"io"
	"log"
	"net/http"
	"os"

	"github.com/mark3labs/mcp-go/mcp"
	"github.com/mark3labs/mcp-go/server"
)

// authKey is a custom context key for storing the auth token.
type authKey struct{}

// withAuthKey adds an auth key to the context.
func withAuthKey(ctx context.Context, auth string) context.Context {
	return context.WithValue(ctx, authKey{}, auth)
}

// authFromRequest extracts the auth token from the request headers.
func authFromRequest(ctx context.Context, r *http.Request) context.Context {
	return withAuthKey(ctx, r.Header.Get("Authorization"))
}

// authFromEnv extracts the auth token from the environment
func authFromEnv(ctx context.Context) context.Context {
	return withAuthKey(ctx, os.Getenv("API_KEY"))
}

// tokenFromContext extracts the auth token from the context.
// This can be used by tools to extract the token regardless of the
// transport being used by the server.
func tokenFromContext(ctx context.Context) (string, error) {
	auth, ok := ctx.Value(authKey{}).(string)
	if !ok {
		return "", fmt.Errorf("missing auth")
	}
	return auth, nil
}

type response struct {
	Args    map[string]interface{} `json:"args"`
	Headers map[string]string      `json:"headers"`
}

// makeRequest makes a request to httpbin.org including the auth token in the request
// headers and the message in the query string.
func makeRequest(ctx context.Context, message, token string) (*response, error) {
	req, err := http.NewRequestWithContext(ctx, "GET", "https://httpbin.org/anything", nil)
	if err != nil {
		return nil, err
	}
	req.Header.Set("Authorization", token)
	query := req.URL.Query()
	query.Add("message", message)
	req.URL.RawQuery = query.Encode()
	resp, err := http.DefaultClient.Do(req)
	if err != nil {
		return nil, err
	}
	defer resp.Body.Close()
	body, err := io.ReadAll(resp.Body)
	if err != nil {
		return nil, err
	}
	var r *response
	if err := json.Unmarshal(body, &r); err != nil {
		return nil, err
	}
	return r, nil
}

// handleMakeAuthenticatedRequestTool is a tool that makes an authenticated request
// using the token from the context.
func handleMakeAuthenticatedRequestTool(
	ctx context.Context,
	request mcp.CallToolRequest,
) (*mcp.CallToolResult, error) {
	message, ok := request.Params.Arguments["message"].(string)
	if !ok {
		return nil, fmt.Errorf("missing message")
	}
	token, err := tokenFromContext(ctx)
	if err != nil {
		return nil, fmt.Errorf("missing token: %v", err)
	}
	// Now our tool can make a request with the token, irrespective of where it came from.
	resp, err := makeRequest(ctx, message, token)
	if err != nil {
		return nil, err
	}
	return mcp.NewToolResultText(fmt.Sprintf("%+v", resp)), nil
}

type MCPServer struct {
	server *server.MCPServer
}

func NewMCPServer() *MCPServer {
	mcpServer := server.NewMCPServer(
		"example-server",
		"1.0.0",
		server.WithResourceCapabilities(true, true),
		server.WithPromptCapabilities(true),
		server.WithToolCapabilities(true),
		server.WithLogging(),
		server.WithRecovery(),
	)
	mcpServer.AddTool(mcp.NewTool("make_authenticated_request",
		mcp.WithDescription("Makes an authenticated request"),
		mcp.WithString("message",
			mcp.Description("Message to echo"),
			mcp.Required(),
		),
	), handleMakeAuthenticatedRequestTool)

	return &MCPServer{
		server: mcpServer,
	}
}

func (s *MCPServer) ServeSSE(addr string) *server.SSEServer {
	return server.NewSSEServer(s.server,
		server.WithBaseURL(fmt.Sprintf("http://%s", addr)),
		server.WithSSEContextFunc(authFromRequest),
	)
}

func (s *MCPServer) ServeStdio() error {
	return server.ServeStdio(s.server, server.WithStdioContextFunc(authFromEnv))
}

func main() {
	var transport string
	flag.StringVar(&transport, "t", "stdio", "Transport type (stdio or sse)")
	flag.Parse()

	s := NewMCPServer()

	switch transport {
	case "stdio":
		if err := s.ServeStdio(); err != nil {
			log.Fatalf("Server error: %v", err)
		}
	case "sse":
		sseServer := s.ServeSSE("localhost:8080")
		log.Printf("SSE server listening on :8080")
		if err := sseServer.Start(":8080"); err != nil {
			log.Fatalf("Server error: %v", err)
		}
	default:
		log.Fatalf(
			"Invalid transport type: %s. Must be 'stdio' or 'sse'",
			transport,
		)
	}
}
mcp-go weather_forecast (sse)
package main

import (
	"context"
	"encoding/json"
	"flag"
	"fmt"
	"log"
	"net/http"
	"time"

	"github.com/mark3labs/mcp-go/mcp"
	"github.com/mark3labs/mcp-go/server"
)

const (
	NWS_API_BASE = "https://api.weather.gov"
	USER_AGENT   = "mcp-weather-app/1.0"
)

type AlertFeature struct {
	Properties struct {
		Event       string `json:"event"`
		AreaDesc    string `json:"areaDesc"`
		Severity    string `json:"severity"`
		Description string `json:"description"`
		Instruction string `json:"instruction"`
	} `json:"properties"`
}

type ForecastPeriod struct {
	Name             string `json:"name"`
	Temperature      int    `json:"temperature"`
	TemperatureUnit  string `json:"temperatureUnit"`
	WindSpeed        string `json:"windSpeed"`
	WindDirection    string `json:"windDirection"`
	DetailedForecast string `json:"detailedForecast"`
}

type WeatherServer struct {
	server *server.MCPServer
	client *http.Client
}

func NewWeatherServer() *WeatherServer {
	// Create HTTP client and set timeout
	client := &http.Client{
		Timeout: 30 * time.Second,
	}

	mcpServer := server.NewMCPServer(
		"weather-server",
		"1.0.0",
		server.WithResourceCapabilities(true, true),
		server.WithLogging(),
		server.WithRecovery(),
	)

	ws := &WeatherServer{
		server: mcpServer,
		client: client,
	}

	// Register tools
	ws.server.AddTool(
		mcp.NewTool("weather_forecast",
			mcp.WithDescription("Get weather forecast for a specified location"),
			mcp.WithNumber("latitude",
				mcp.Description("Latitude"),
				mcp.Required(),
			),
			mcp.WithNumber("longitude",
				mcp.Description("Longitude"),
				mcp.Required(),
			),
		),
		ws.handleGetForecast,
	)

	return ws
}

// Generic request method
func (ws *WeatherServer) makeNWSRequest(ctx context.Context, url string) (map[string]interface{}, error) {
	req, err := http.NewRequestWithContext(ctx, "GET", url, nil)
	if err != nil {
		return nil, err
	}

	req.Header.Set("User-Agent", USER_AGENT)
	req.Header.Set("Accept", "application/geo+json")

	resp, err := ws.client.Do(req)
	if err != nil {
		return nil, err
	}
	defer resp.Body.Close()

	if resp.StatusCode >= 400 {
		return nil, fmt.Errorf("API request failed: %s", resp.Status)
	}

	var data map[string]interface{}
	if err := json.NewDecoder(resp.Body).Decode(&data); err != nil {
		return nil, err
	}

	return data, nil
}

func (ws *WeatherServer) handleGetForecast(ctx context.Context, req mcp.CallToolRequest) (*mcp.CallToolResult, error) {
	lat, lon, err := parseCoordinates(req)
	if err != nil {
		return nil, err
	}

	pointsUrl := fmt.Sprintf("%s/points/%f,%f", NWS_API_BASE, lat, lon)
	pointsData, err := ws.makeNWSRequest(ctx, pointsUrl)
	if err != nil {
		return nil, fmt.Errorf("failed to get prediction point: %v", err)
	}

	forecastUrl, ok := pointsData["properties"].(map[string]interface{})["forecast"].(string)
	if !ok {
		return nil, fmt.Errorf("invalid prediction point response")
	}

	forecastData, err := ws.makeNWSRequest(ctx, forecastUrl)
	if err != nil {
		return nil, fmt.Errorf("failed to get forecast data: %v", err)
	}

	periods, ok := forecastData["properties"].(map[string]interface{})["periods"].([]interface{})
	if !ok {
		return nil, fmt.Errorf("invalid forecast data format")
	}

	var forecasts []string
	for _, p := range periods[:5] {
		periodBytes, _ := json.Marshal(p)
		var period ForecastPeriod
		json.Unmarshal(periodBytes, &period)

		forecast := fmt.Sprintf(`
	%s:
	Temperature: %d°%s
	Wind: %s %s
	Forecast: %s`,
			period.Name,
			period.Temperature,
			period.TemperatureUnit,
			period.WindSpeed,
			period.WindDirection,
			period.DetailedForecast,
		)
		forecasts = append(forecasts, forecast)
	}

	return mcp.NewToolResultText(fmt.Sprintf("%s\n---\n", forecasts)), nil
}

func parseCoordinates(req mcp.CallToolRequest) (float64, float64, error) {
	lat, ok := req.Params.Arguments["latitude"].(float64)
	if !ok {
		return 0, 0, fmt.Errorf("invalid latitude parameter")
	}

	lon, ok := req.Params.Arguments["longitude"].(float64)
	if !ok {
		return 0, 0, fmt.Errorf("invalid longitude parameter")
	}

	return lat, lon, nil
}

func (s *WeatherServer) ServeSSE(addr string) *server.SSEServer {
	return server.NewSSEServer(s.server, server.WithBaseURL(fmt.Sprintf("http://%s", addr)))
}

func (s *WeatherServer) ServeStdio() error {
	return server.ServeStdio(s.server)
}

func main() {
	var transport string
	flag.StringVar(&transport, "t", "stdio", "Transport type (stdio or sse)")
	flag.Parse()

	ws := NewWeatherServer()

	switch transport {
	case "stdio":
		if err := ws.ServeStdio(); err != nil {
			log.Fatalf("Server error: %v", err)
		}
	case "sse":
		sseServer := ws.ServeSSE("localhost:8080")
		log.Printf("SSE server listening on :8080")
		if err := sseServer.Start(":8080"); err != nil {
			log.Fatalf("Server error: %v", err)
		}
	default:
		log.Fatalf("Invalid transport type: %s. Must be 'stdio' or 'sse'", transport)
	}
}
Filesystem MCP Server
https://github.com/mark3labs/mcp-filesystem-server
Go server implementing Model Context Protocol (MCP) for filesystem operations.
MCP MongoDB Server
https://github.com/kiliczsh/mcp-mongo-server
A Model Context Protocol server that enables LLMs to interact with MongoDB databases. This server provides capabilities for inspecting collection schemas and executing MongoDB operations through a standardized interface.
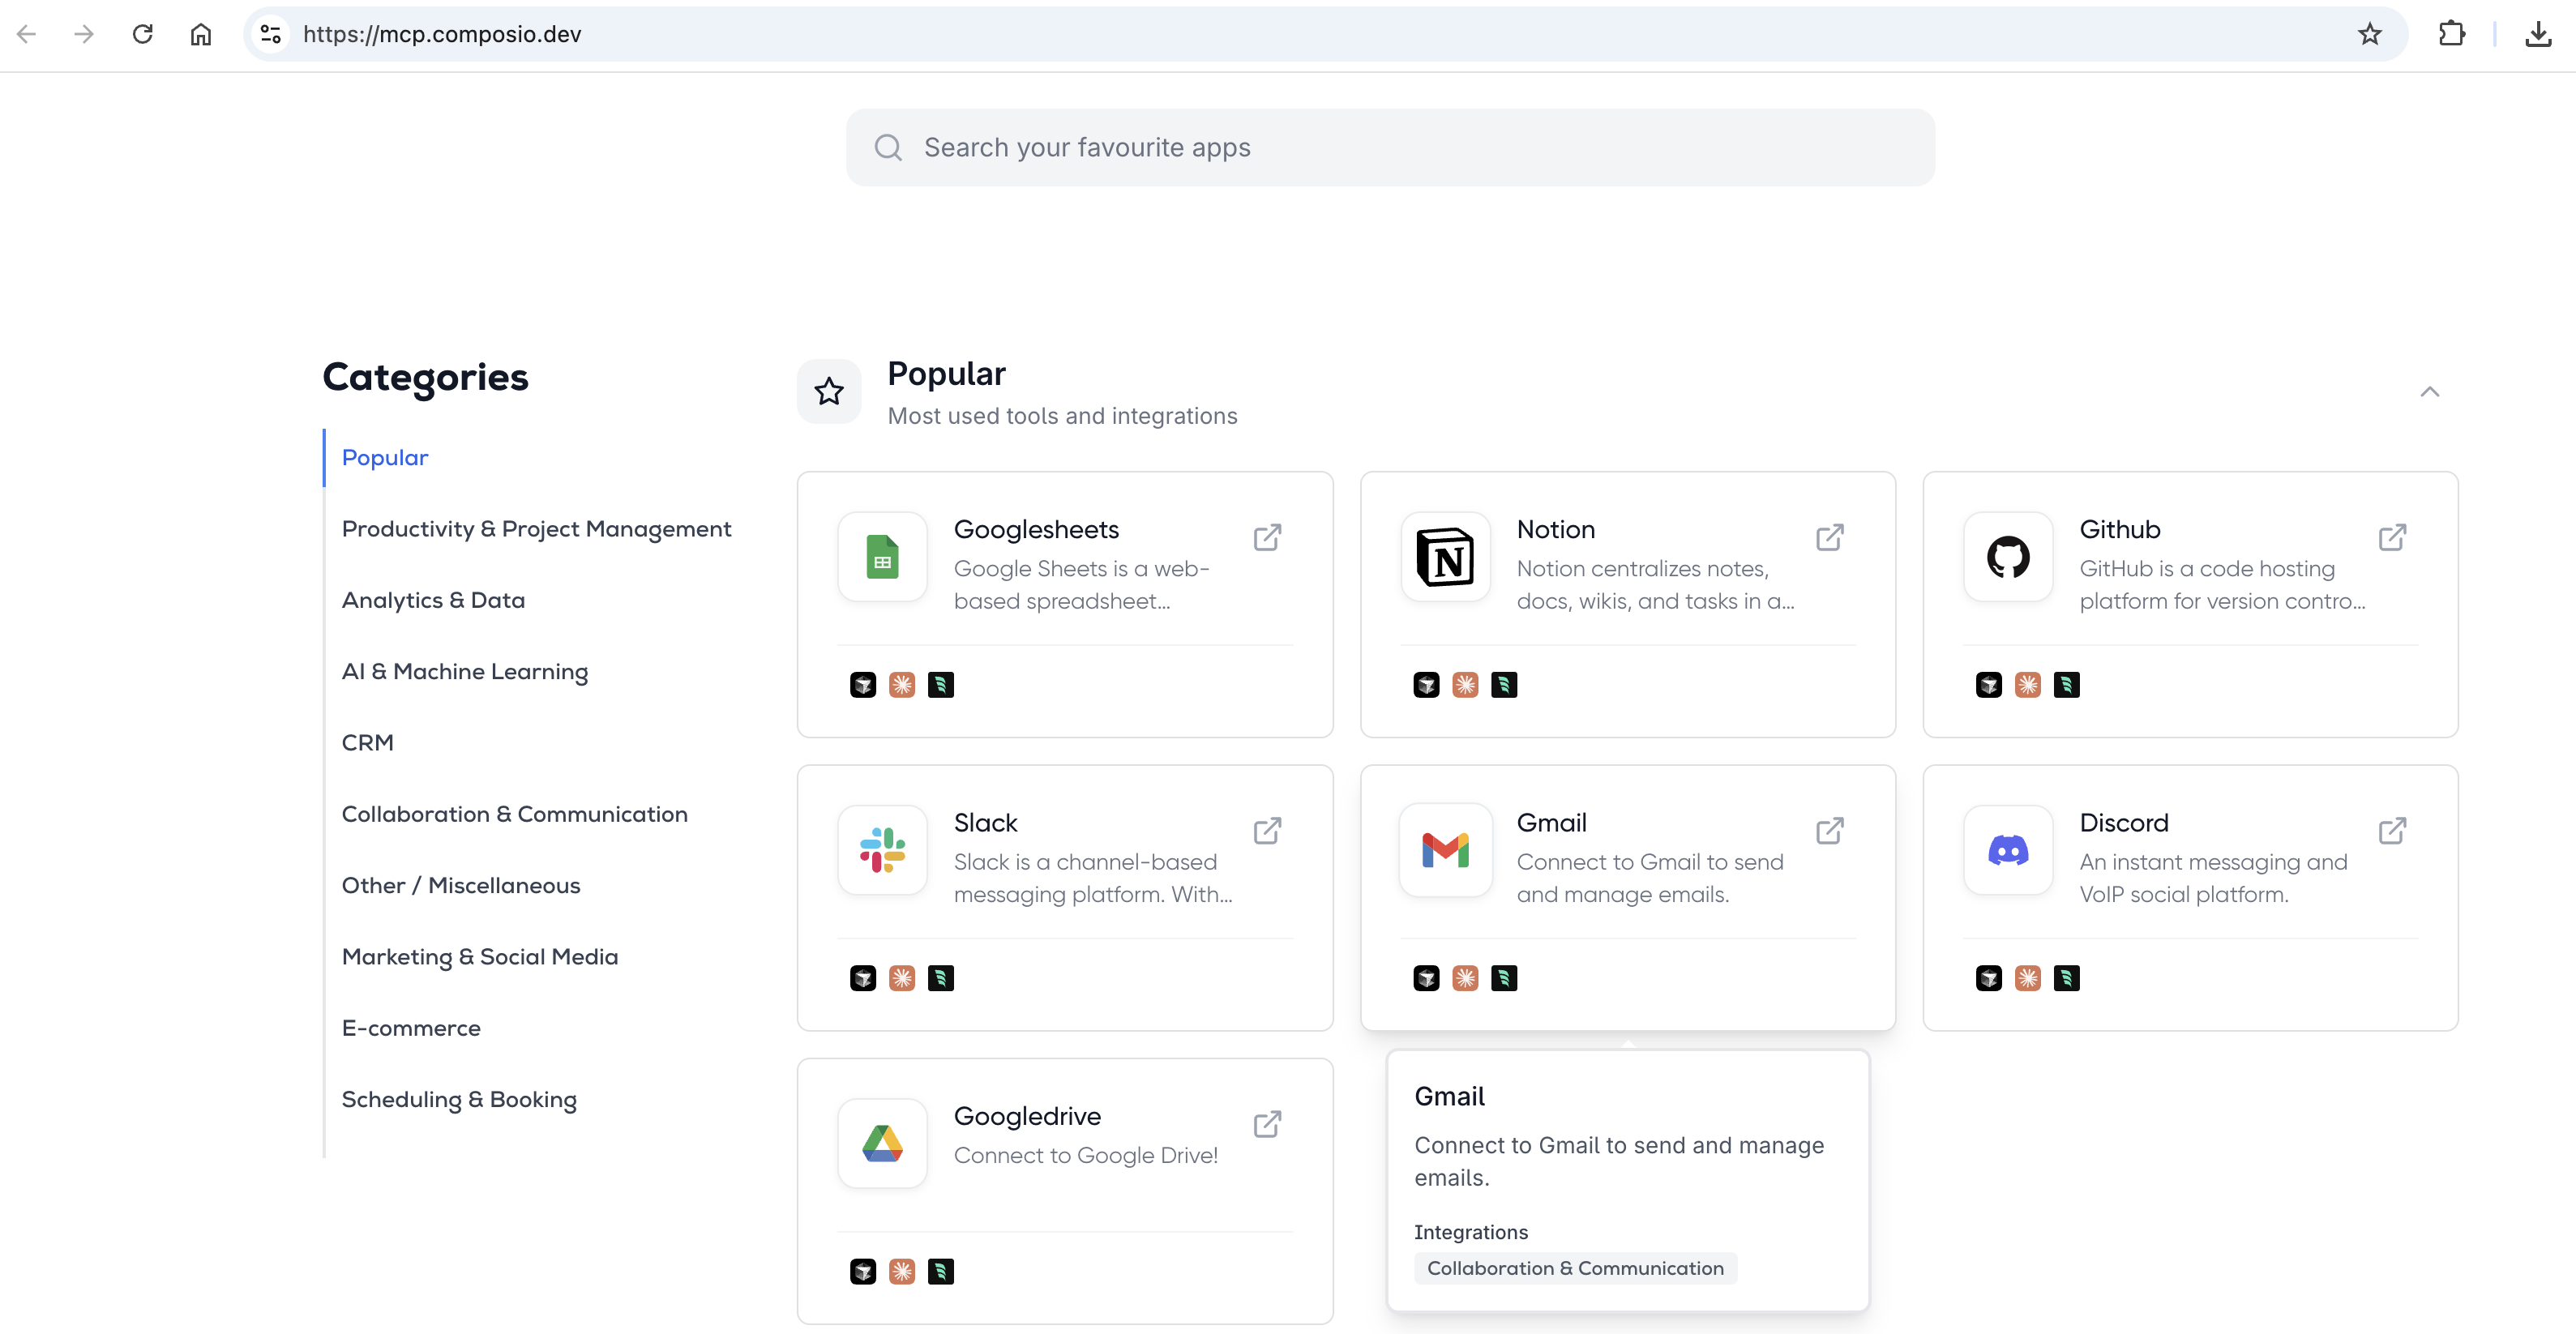
mcp.composio.dev/weathermap
https://mcp.composio.dev/weathermap


Others
https://github.com/modelcontextprotocol/quickstart-resources
A repository of servers and clients from the following Model Context Protocol tutorials:
- Quickstart – a simple MCP weather server
- Building MCP clients – an LLM-powered chatbot MCP client
TypeScript Example
System requirements
For TypeScript, make sure you have the latest version of Node installed.
Set up your environment
First, let’s install Node.js and npm if you haven’t already. You can download them from nodejs.org. Verify your Node.js installation:
node --version
npm --version
For this tutorial, you’ll need Node.js version 16 or higher.
Install Node.js
https://nodejs.org/zh-cn/download
# Download and install nvm:
curl -o- https://raw.githubusercontent.com/nvm-sh/nvm/v0.40.2/install.sh | bash

# in lieu of restarting the shell
\. "$HOME/.nvm/nvm.sh"

# Download and install Node.js:
nvm install 22

# Verify the Node.js version:
node -v # Should print "v22.14.0".
nvm current # Should print "v22.14.0".

# Verify npm version:
npm -v # Should print "10.9.2".
Create and Set up Our Project
# Create a new directory for our project
mkdir weather
cd weather

# Initialize a new npm project
npm init -y

# Install dependencies
npm install @modelcontextprotocol/sdk zod
npm install -D @types/node typescript

# Create our files
mkdir src
touch src/index.ts
Update your package.json to add type: “module” and a build script:
{
  "type": "module",
  "bin": {
    "weather": "./build/index.js"
  },
  "scripts": {
    "build": "tsc && chmod 755 build/index.js"
  },
  "files": [
    "build"
  ],
}
Create a tsconfig.json in the root of your project:
{
  "compilerOptions": {
    "target": "ES2022",
    "module": "Node16",
    "moduleResolution": "Node16",
    "outDir": "./build",
    "rootDir": "./src",
    "strict": true,
    "esModuleInterop": true,
    "skipLibCheck": true,
    "forceConsistentCasingInFileNames": true
  },
  "include": ["src/**/*"],
  "exclude": ["node_modules"]
}
Now let’s dive into building your server.
Building your server
Importing packages and setting up the instance
Add these to the top of your src/index.ts:
import { McpServer } from "@modelcontextprotocol/sdk/server/mcp.js";
import { StdioServerTransport } from "@modelcontextprotocol/sdk/server/stdio.js";
import { z } from "zod";

const NWS_API_BASE = "https://api.weather.gov";
const USER_AGENT = "weather-app/1.0";

// Create server instance
const server = new McpServer({
  name: "weather",
  version: "1.0.0",
  capabilities: {
    resources: {},
    tools: {},
  },
});
Helper functions
Next, let’s add our helper functions for querying and formatting the data from the National Weather Service API:
// Helper function for making NWS API requests
async function makeNWSRequest<T>(url: string): Promise<T | null> {
  const headers = {
    "User-Agent": USER_AGENT,
    Accept: "application/geo+json",
  };

  try {
    const response = await fetch(url, { headers });
    if (!response.ok) {
      throw new Error(`HTTP error! status: ${response.status}`);
    }
    return (await response.json()) as T;
  } catch (error) {
    console.error("Error making NWS request:", error);
    return null;
  }
}

interface AlertFeature {
  properties: {
    event?: string;
    areaDesc?: string;
    severity?: string;
    status?: string;
    headline?: string;
  };
}

// Format alert data
function formatAlert(feature: AlertFeature): string {
  const props = feature.properties;
  return [
    `Event: ${props.event || "Unknown"}`,
    `Area: ${props.areaDesc || "Unknown"}`,
    `Severity: ${props.severity || "Unknown"}`,
    `Status: ${props.status || "Unknown"}`,
    `Headline: ${props.headline || "No headline"}`,
    "---",
  ].join("\n");
}

interface ForecastPeriod {
  name?: string;
  temperature?: number;
  temperatureUnit?: string;
  windSpeed?: string;
  windDirection?: string;
  shortForecast?: string;
}

interface AlertsResponse {
  features: AlertFeature[];
}

interface PointsResponse {
  properties: {
    forecast?: string;
  };
}

interface ForecastResponse {
  properties: {
    periods: ForecastPeriod[];
  };
}
Implementing tool execution
The tool execution handler is responsible for actually executing the logic of each tool. Let’s add it:
// Register weather tools
server.tool(
  "get-alerts",
  "Get weather alerts for a state",
  {
    state: z.string().length(2).describe("Two-letter state code (e.g. CA, NY)"),
  },
  async ({ state }) => {
    const stateCode = state.toUpperCase();
    const alertsUrl = `${NWS_API_BASE}/alerts?area=${stateCode}`;
    const alertsData = await makeNWSRequest<AlertsResponse>(alertsUrl);

    if (!alertsData) {
      return {
        content: [
          {
            type: "text",
            text: "Failed to retrieve alerts data",
          },
        ],
      };
    }

    const features = alertsData.features || [];
    if (features.length === 0) {
      return {
        content: [
          {
            type: "text",
            text: `No active alerts for ${stateCode}`,
          },
        ],
      };
    }

    const formattedAlerts = features.map(formatAlert);
    const alertsText = `Active alerts for ${stateCode}:\n\n${formattedAlerts.join("\n")}`;

    return {
      content: [
        {
          type: "text",
          text: alertsText,
        },
      ],
    };
  },
);

server.tool(
  "get-forecast",
  "Get weather forecast for a location",
  {
    latitude: z.number().min(-90).max(90).describe("Latitude of the location"),
    longitude: z.number().min(-180).max(180).describe("Longitude of the location"),
  },
  async ({ latitude, longitude }) => {
    // Get grid point data
    const pointsUrl = `${NWS_API_BASE}/points/${latitude.toFixed(4)},${longitude.toFixed(4)}`;
    const pointsData = await makeNWSRequest<PointsResponse>(pointsUrl);

    if (!pointsData) {
      return {
        content: [
          {
            type: "text",
            text: `Failed to retrieve grid point data for coordinates: ${latitude}, ${longitude}. This location may not be supported by the NWS API (only US locations are supported).`,
          },
        ],
      };
    }

    const forecastUrl = pointsData.properties?.forecast;
    if (!forecastUrl) {
      return {
        content: [
          {
            type: "text",
            text: "Failed to get forecast URL from grid point data",
          },
        ],
      };
    }

    // Get forecast data
    const forecastData = await makeNWSRequest<ForecastResponse>(forecastUrl);
    if (!forecastData) {
      return {
        content: [
          {
            type: "text",
            text: "Failed to retrieve forecast data",
          },
        ],
      };
    }

    const periods = forecastData.properties?.periods || [];
    if (periods.length === 0) {
      return {
        content: [
          {
            type: "text",
            text: "No forecast periods available",
          },
        ],
      };
    }

    // Format forecast periods
    const formattedForecast = periods.map((period: ForecastPeriod) =>
      [
        `${period.name || "Unknown"}:`,
        `Temperature: ${period.temperature || "Unknown"}°${period.temperatureUnit || "F"}`,
        `Wind: ${period.windSpeed || "Unknown"} ${period.windDirection || ""}`,
        `${period.shortForecast || "No forecast available"}`,
        "---",
      ].join("\n"),
    );

    const forecastText = `Forecast for ${latitude}, ${longitude}:\n\n${formattedForecast.join("\n")}`;

    return {
      content: [
        {
          type: "text",
          text: forecastText,
        },
      ],
    };
  },
);
Running the server
Finally, implement the main function to run the server:
async function main() {
  const transport = new StdioServerTransport();
  await server.connect(transport);
  console.error("Weather MCP Server running on stdio");
}

main().catch((error) => {
  console.error("Fatal error in main():", error);
  process.exit(1);
});
Make sure to run npm run build to build your server! This is a very important step in getting your server to connect.
Let’s now test your server from an existing MCP host, Claude for Desktop.
Testing Your Server
通过 Cursor 测试 MCP 服务是否正常:
{
    "mcpServers": {
      "typescript-weather1": {
        "command": "node",
        "args": [
            "/data/home/gerryyang/git/jlib/mcp-server/typescript/weather/build/index.js"
        ]
      },
      "typescript-weather2": {
        "url": "http://localhost:8080/sse"
      }
    }
}
Note: Since this is the US National Weather service, the queries will only work for US locations.
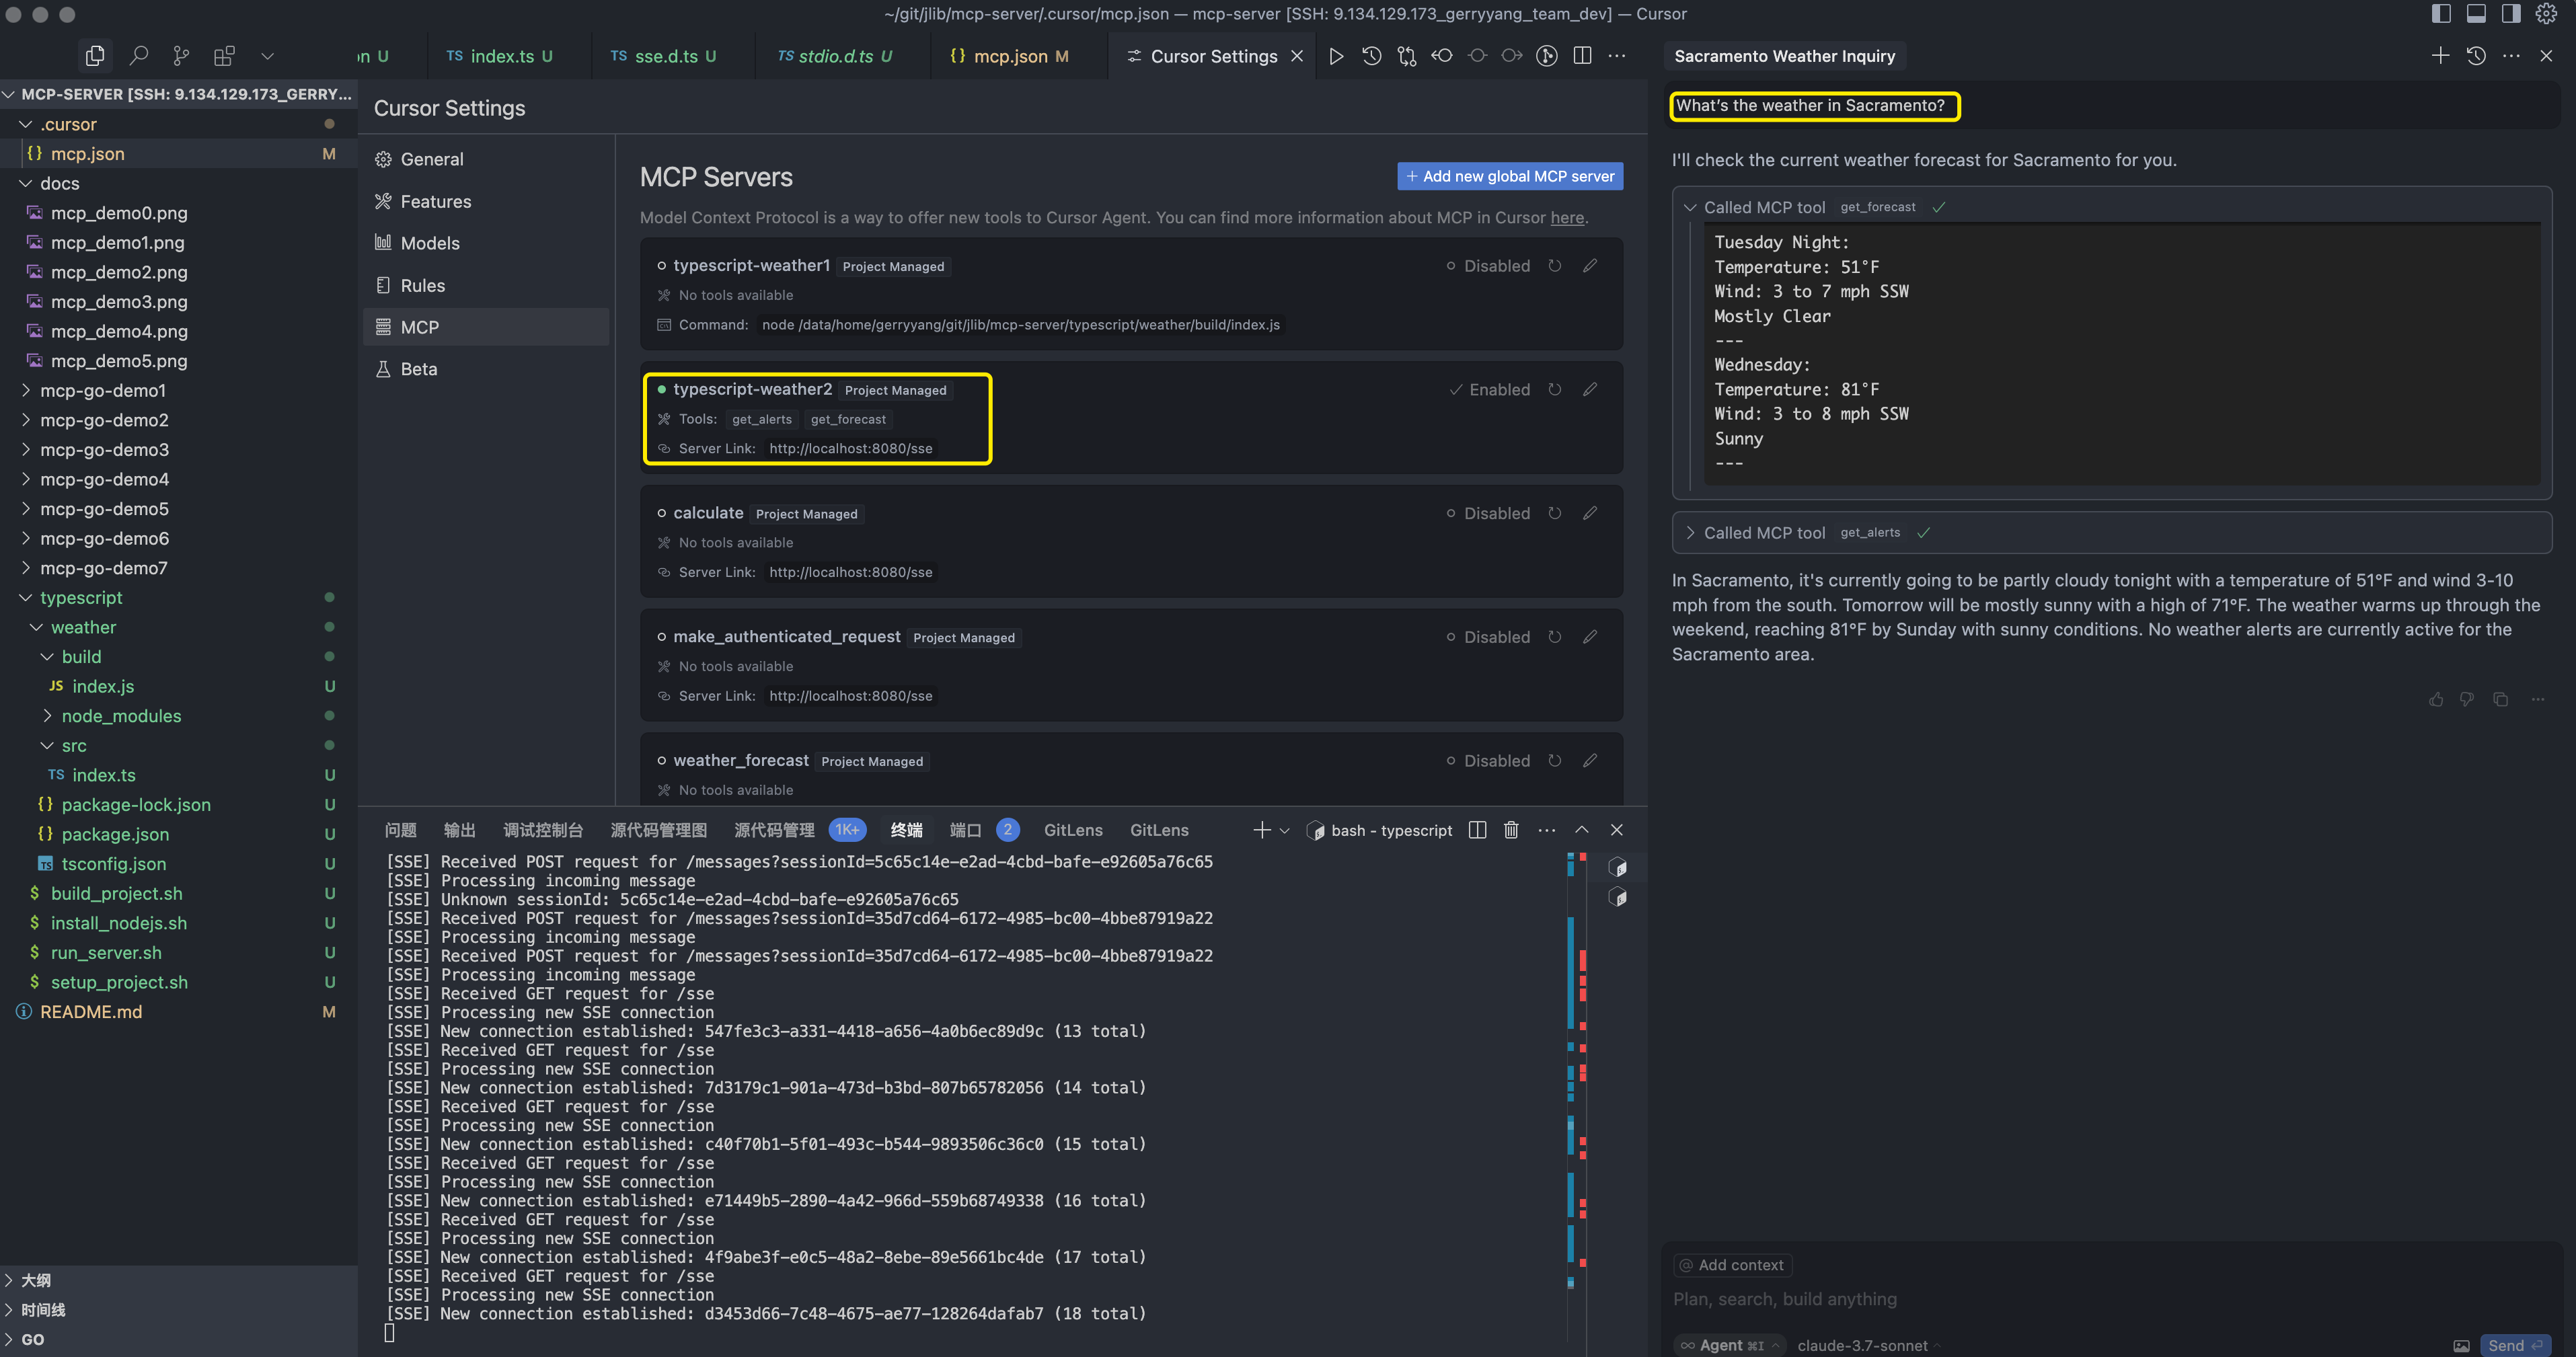
What’s happening under the hood
When you ask a question:
- The client sends your question to Cursor
- Cursor analyzes the available tools and decides which one(s) to use
- The client executes the chosen tool(s) through the MCP server
- The results are sent back to Cursor
- Cursor formulates a natural language response
- The response is displayed to you!
MCP Server (第三方服务)
mcp.composio.dev
Instantly Connect to 100+ Managed MCP Servers with Built-In Auth
Awesome MCP Servers
https://mcpservers.org/
A collection of servers for the Model Context Protocol.
MCP Roadmap
https://modelcontextprotocol.io/development/roadmap
Debugging
https://modelcontextprotocol.io/docs/tools/debugging
A comprehensive guide to debugging Model Context Protocol (MCP) integrations
Effective debugging is essential when developing MCP servers or integrating them with applications. This guide covers the debugging tools and approaches available in the MCP ecosystem.
Inspector
https://github.com/modelcontextprotocol/inspector
In-depth guide to using the MCP Inspector for testing and debugging Model Context Protocol servers
The MCP Inspector is an interactive developer tool for testing and debugging MCP servers. While the Debugging Guide covers the Inspector as part of the overall debugging toolkit, this document provides a detailed exploration of the Inspector’s features and capabilities.
由于 MCP 服务器通过标准输入输出通信,调试可能具有挑战性。可以使用 MCP Inspector,可以通过以下脚本运行:
npm run inspector。Inspector 将提供一个 URL,用于在浏览器中访问调试工具。
Q&A
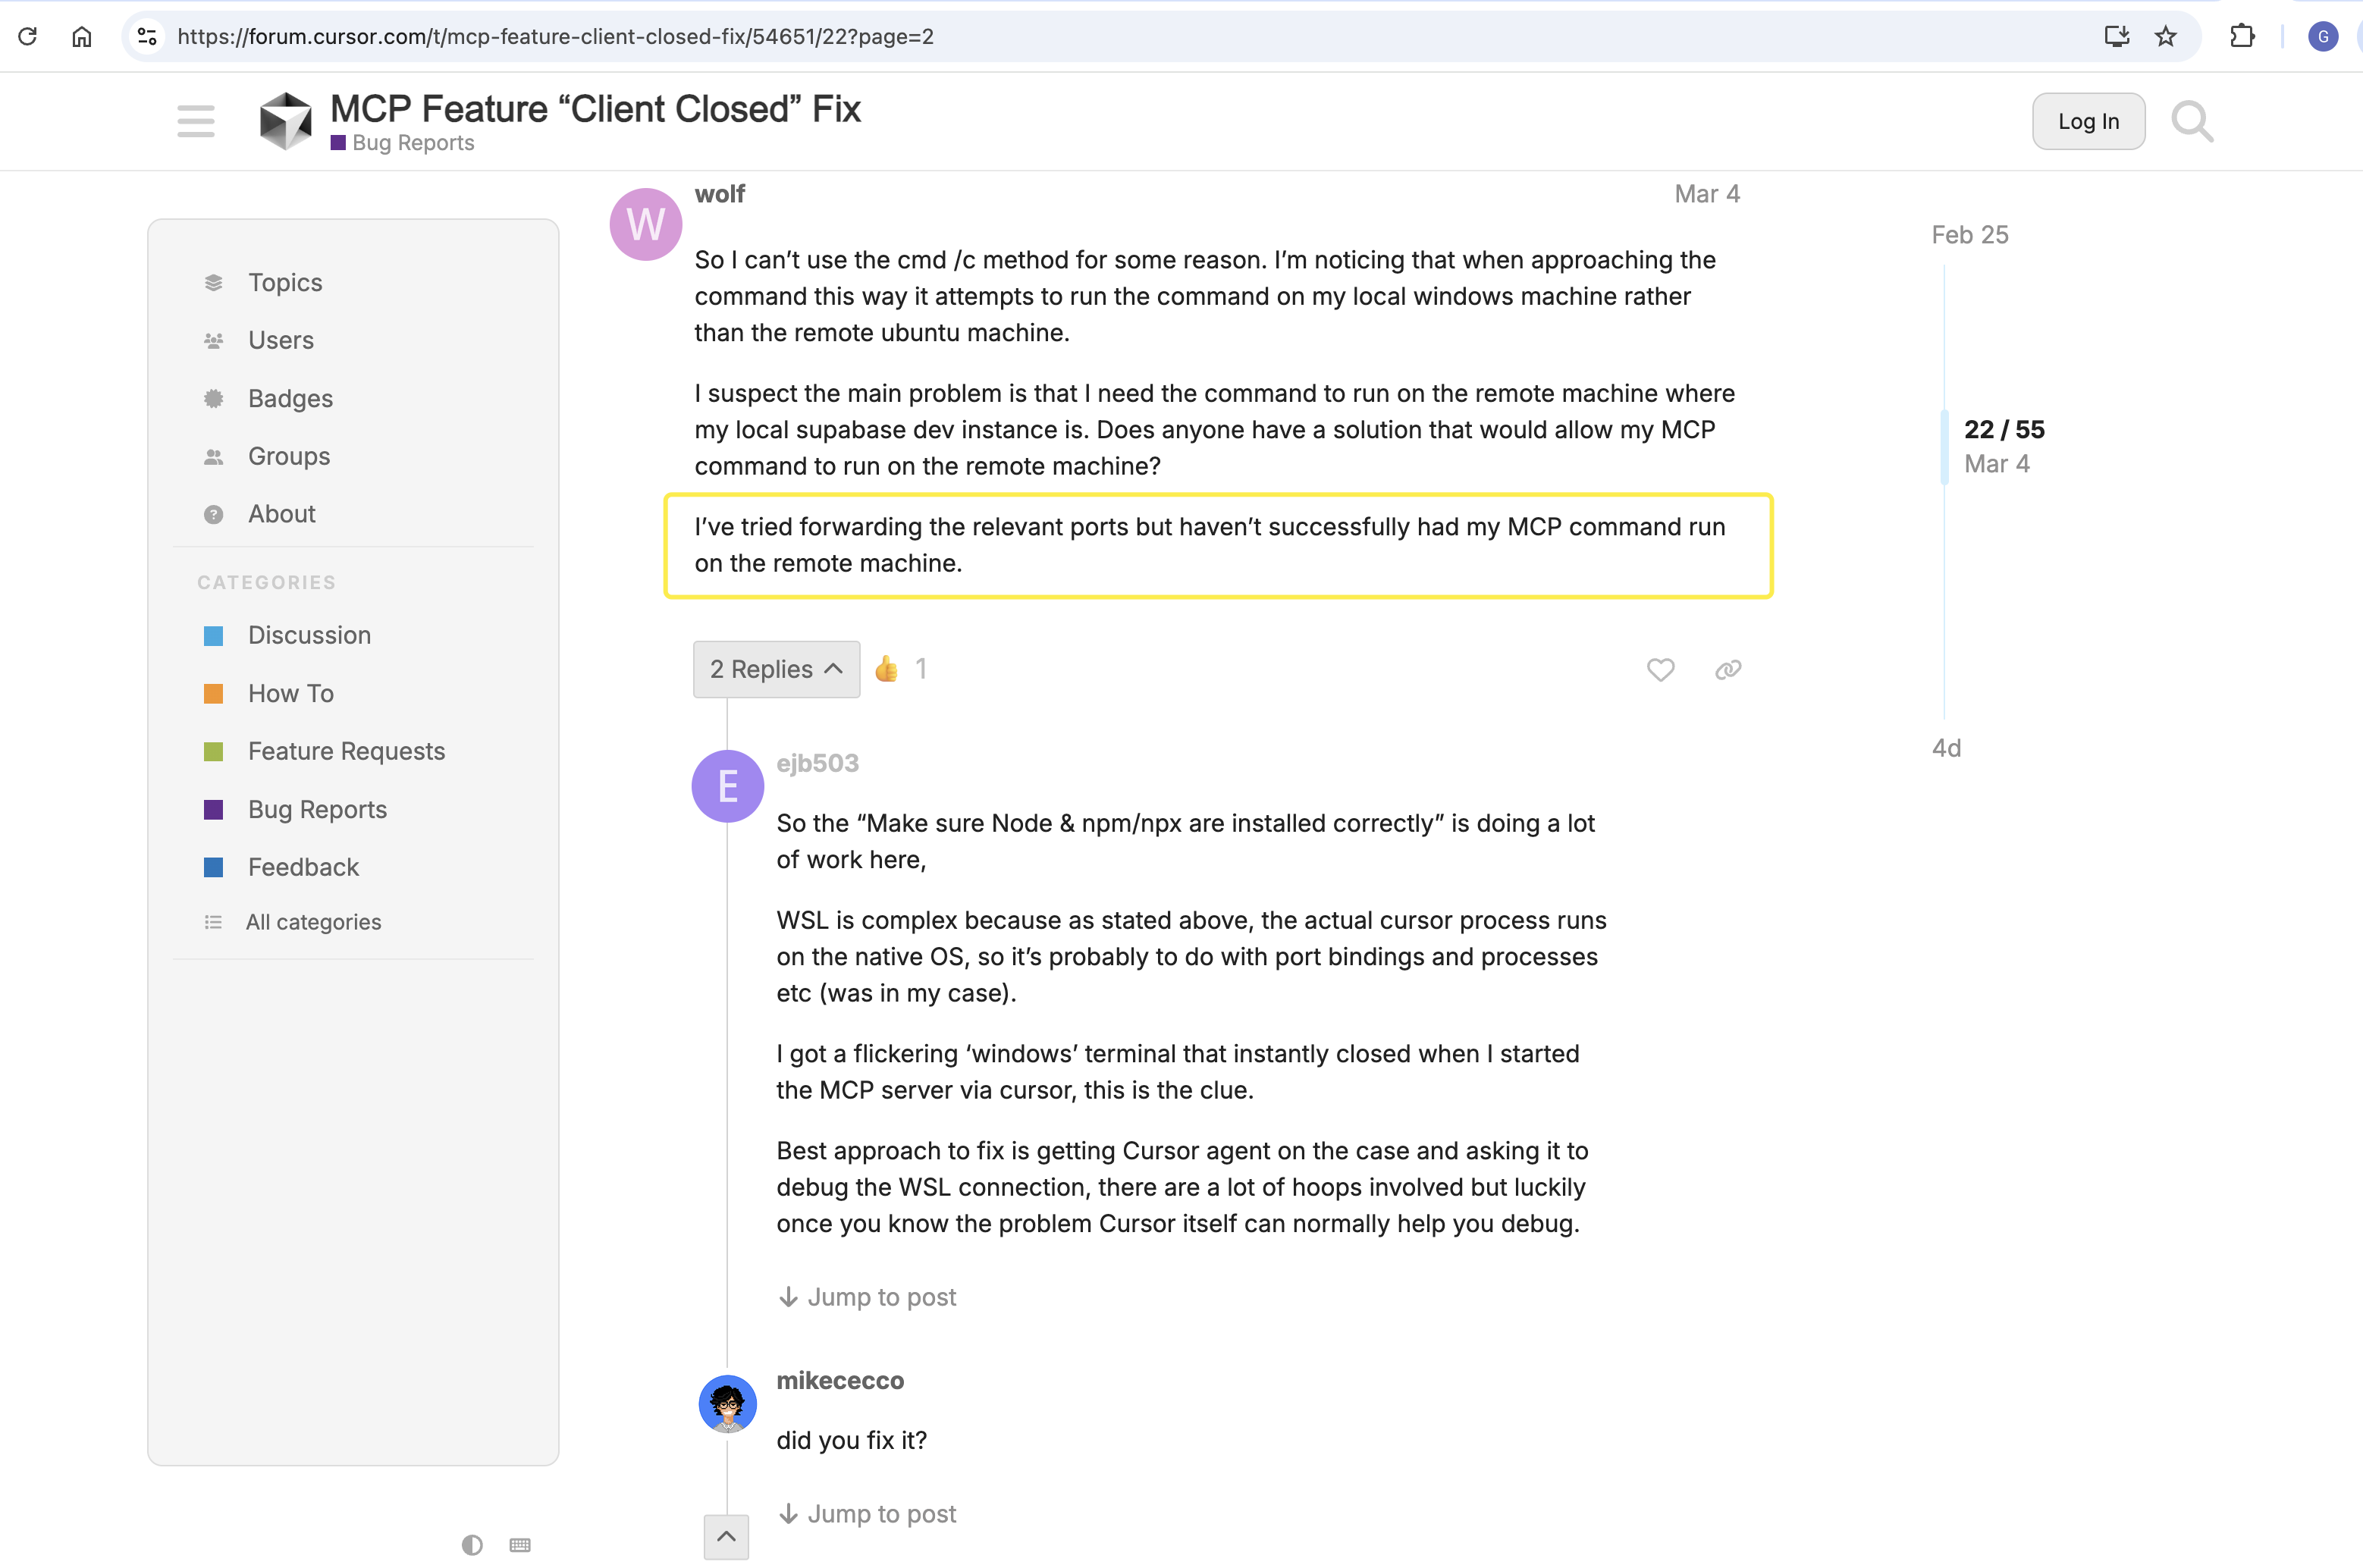
MCP Feature “Client Closed” Fix
-
https://forum.cursor.com/t/mcp-feature-client-closed-fix/54651
-
https://github.com/modelcontextprotocol/servers/issues/891
-
https://apidog.com/blog/how-to-fix-cursor-ai-mcp-feature-client-closed-error/
问题:通过 Cursor 远程开发连接的工程,如果使用 stdio 的方式测试 MCP 服务会出现 “Client Closed” 的错误,只有 sse 方式的 MCP 可以正常使用。通过下面的回复信息可以看到其他人也遇到了类似额的问题。
解决方法:在 MacOS 环境下,使用 Cursor 在本地环境测试 stdio 的 MCP 服务发现可以正常使用。
{
    "mcpServers": {
      "calculate1": {
        "command": "/Users/gerry/Proj/git/jlib/mcp-server/mcp-go-demo1/mcp-go-demo1"
      },
      "typescript-weather1": {
        "command": "node",
        "args": [
            "/Users/gerry/Proj/git/jlib/mcp-server/typescript-demo/weather/build/index.js"
        ]
      }
    }
}
TODO
- Building MCP Servers: Part 1 — Getting Started with Resources
- Building MCP Servers: Part 2 — Extending Resources with Resource Templates
- Building MCP Servers: Part 3 — Adding Prompts
- Building MCP Servers: Part 4 — Creating Tools
Refer
- https://github.com/modelcontextprotocol
- https://modelcontextprotocol.io/introduction
- Example Clients
- Example Servers
- https://github.com/punkpeye/awesome-mcp-servers
- https://github.com/mark3labs/mcp-go
- Build and use your own MCP in Cursor in 5 minutes
- https://cursor.directory/mcp/demo-everything
- https://github.com/modelcontextprotocol/servers/tree/HEAD/src/everything
- https://github.com/modelcontextprotocol/quickstart-resources
- MCP协议深度解读:技术创新正以前所未有的速度突破
- 图解模型上下文协议(MCP)
- (译) JSON-RPC 2.0 规范(中文版)
- MCP 官方规范:https://spec.modelcontextprotocol.io/specification/2024-11-05/
- MCP (Model Context Protocol),一篇就够了